Convert Lovable App to Mobile App: Paths and Steps
Convert Lovable app to mobile app the right way: compare PWA, wrapper and Expo rebuild, then clear App Store and Google Play review.

The most popular advice about the convert Lovable app to mobile app problem says wrap the site in a native shell and ship it in an afternoon. The wrap is real. The afternoon is fiction, because two jobs hide inside it: making the client behave like a native app at review time, and keeping it maintainable after launch. Mobile work is a discipline of its own, and Market Research Future estimated the global mobile app development market at $94.4 billion in 2024 (Market Research Future), which is a fair measure of the distance between a working website and a shipped app.
Lovable produces a Vite and React web application. That means your business logic, Supabase schema, API calls, and TypeScript types are usually reusable, while the DOM-based interface, browser routing, browser storage, OAuth redirects, and web-only packages usually are not. So the decision isn't app or no app. It's how much of the client you rebuild, and how much store risk you accept in exchange for not rebuilding it.
Table of Contents
- Choose Between a Wrapper, PWA and Native Rebuild
- Audit Which Lovable Parts Survive the Move
- Add Native Value So Apple Does Not Reject It
- How to Rebuild Your Lovable App in Expo
- Store Requirements and Google Play Testing Gate
- Choose Your Path and Start the Audit This Week
<a id="choose-between-a-wrapper-pwa-and-native-rebuild"></a>
Choose Between a Wrapper, PWA and Native Rebuild
Three paths exist, and each one trades engineering effort against app-store risk in a different ratio. The Native.Express breakdown of Lovable mobile paths frames them precisely: a Progressive Web App packages the existing site so it can be installed from a browser, a Capacitor wrapper places that site inside a native shell, and a React Native or Expo rebuild recreates the interface natively while keeping a backend such as Supabase. These are not three flavours of one outcome. A PWA does not automatically become an App Store or Google Play application. A wrapper produces store binaries and selected device integrations, yet what users touch can still read as a website. A rebuild replaces navigation, layouts, authentication flows, device permissions, notifications, and offline behavior, and it pulls mobile design, testing, signing, privacy, and submission work along with it.
The comparison below is the decision, compressed.
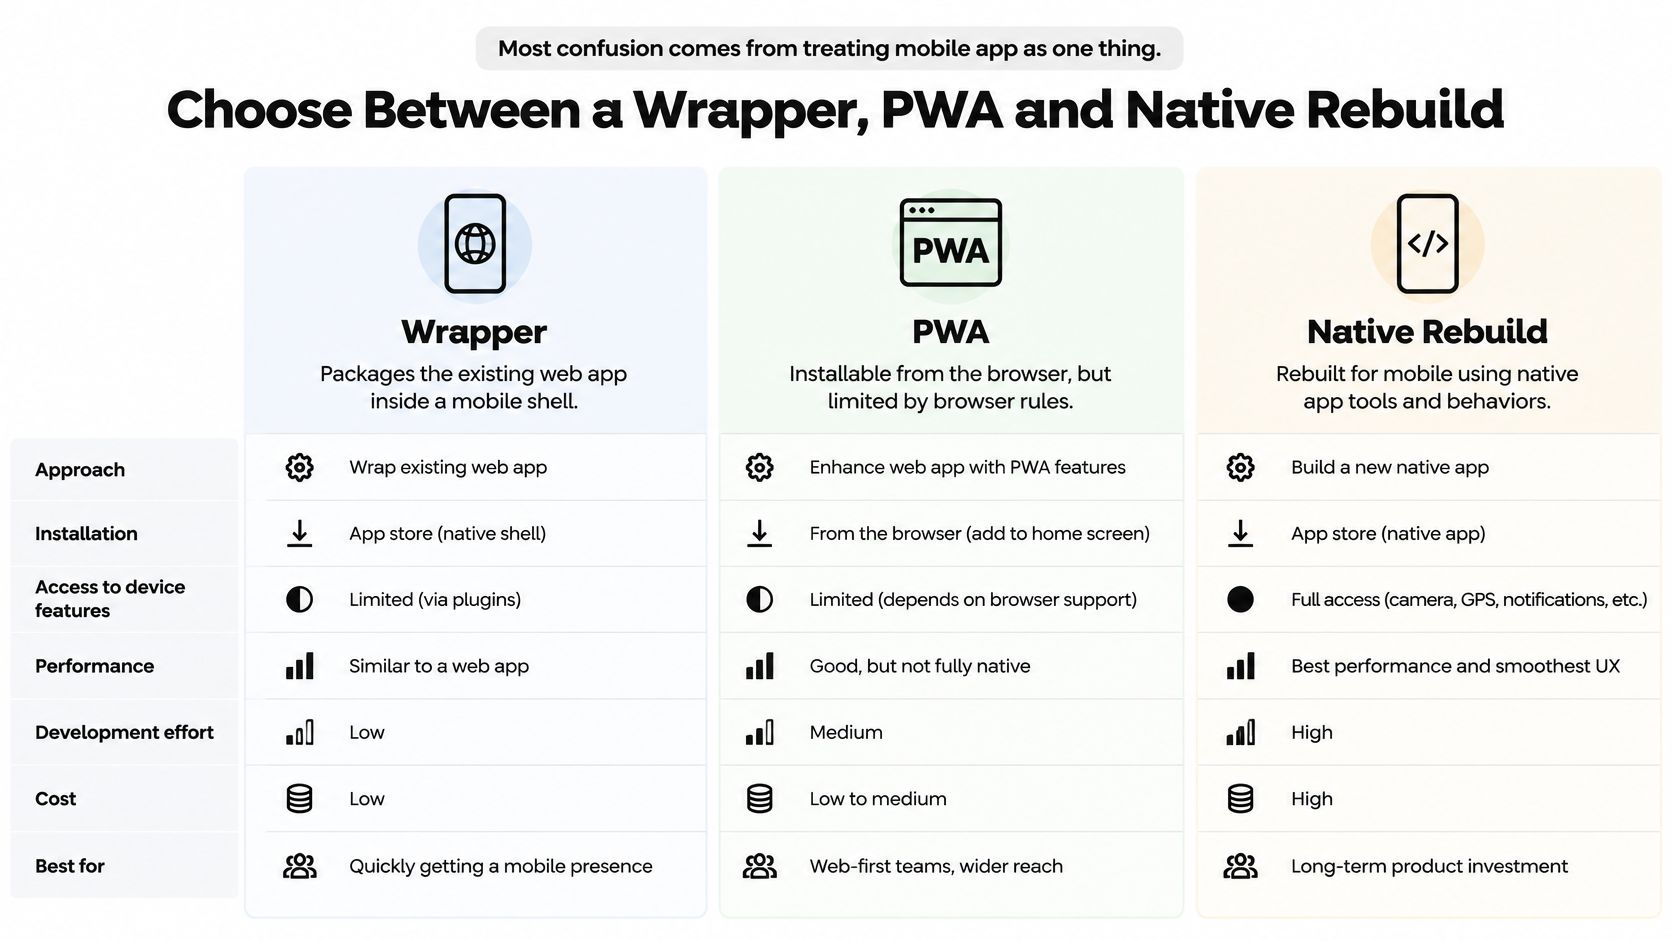
| Path | What You Get | Store Risk | Effort | Best When |
|---|---|---|---|---|
| Progressive Web App | Installable web app from the browser | Not a store app by itself | Low | Users only need a home-screen shortcut |
| Capacitor wrapper | Existing site in a native shell with store binaries | High if the app is a thin wrapper (Guideline 4.2) | Low to moderate | The site is solid and needs only a few device features |
| React Native or Expo rebuild | Native screens, navigation and device APIs on the same Supabase backend | Lowest when the app adds real native value | High | Camera, push, offline, biometrics or frequent use matter |
Read that table as a cost curve. The cheapest row pushes risk onto a reviewer's desk, where you cannot schedule it. The most expensive row puts the work where you can plan, test, and ship it. There is a second axis the table compresses: maintenance. A WebView shell inherits every quirk of the mobile browser on every OS version, so fixes land where you have the least debugging tooling. A native client fails in places you can reproduce and instrument.
The rebuild option also looks less costly once you scope it correctly. The migration is client-only. Your Supabase schema, accounts, stored data, row-level security, edge functions, and business logic all stay put, which means the riskiest part of any migration, the data layer, never moves. You are swapping a DOM interface for native screens, not re-platforming the product.
Practical rule: a wrapper can be a reasonable call when the app mostly displays content and collects form input, provided it ships with meaningful native functionality rather than a bare WebView. Reviewers weigh the whole app, so native features lower the risk without removing it. When the core journey depends on the camera, scanning, biometrics, push, offline use, or daily sessions, budget for an Expo rebuild instead.
For a second opinion on where browser capabilities stop on real hardware, the Capgo guide for mobile teams is a useful sanity check before you commit. It maps what a PWA handles well against what needs a native runtime, which is the same line you are drawing here.
Three questions settle the path faster than any feature matrix. Which features need the device? A share sheet is a different requirement from background location. Does it need to work offline? If yes, you are building caching and sync, and that logic is harder to reason about inside a WebView than in native code. How often will users open it? Daily use justifies a native client. Quarterly use barely justifies an install.
For the wrapper or PWA route, the sequence is short. Confirm the web app holds up on a phone: open production in a mobile browser, walk the main journey, verify login completes. Add the shell: for Capacitor, point it at the production URL or bundle the static build inside the binary. Add the device features that justify a store listing, such as push notifications, camera access, and system sharing, so the release is more than a website in a box. Generate both binaries, test on physical devices, and submit with reviewer notes that name the native features and where to find them. A PWA skips the last three: a web manifest, icons, and a tested install prompt are the whole job.
<a id="audit-which-lovable-parts-survive-the-move"></a>
Audit Which Lovable Parts Survive the Move
Inventory comes before tooling, always. Export the Lovable Vite and React project, commit it, then list every route, authentication flow, Supabase table, storage bucket, edge function, permission, and browser-only dependency. That list is your scope document. Without it, estimates are guesses and the rebuild surprises you one screen at a time.
Here's the split I use for a typical Lovable project.
| Lovable Part | Keep or Rebuild | Mobile Requirement |
|---|---|---|
| Supabase tables, RPC names and RLS rules | Keep | Keep queries and table names as close to unchanged as possible |
| Business logic and TypeScript types | Usually reuse | Port with minimal change |
| Authentication flows | Rebuild the session layer | Durable session storage and OAuth deep links |
| Routes | Rebuild | Expo Router replaces browser routing |
| localStorage | Replace | AsyncStorage or MMKV |
| shadcn/ui components and CSS layout | Rebuild | View, Text, TextInput and FlatList |
| Recharts, rich-text editors, drag-and-drop | Rebuild or replace | Native or library equivalents that avoid the DOM |
| PDF generation and web checkout | Replace | Native-compatible libraries or a different payment route |
Now score one screen out loud. Take a dashboard that renders a Recharts chart, filters by date with a shadcn select, and writes to a reports table through a Supabase RPC. The query, the RPC name, the table, and the row-level security policy all carry over untouched. The chart, the select, and the CSS grid around them do not, because they depend on the DOM. That screen scores rebuild, but only its presentation changes. Mark every screen that way and you get a rebuild count rather than a feeling.
The check that catches most of this: sign in on the device build, force-close the app completely, then reopen it and confirm the session survives. Then run an OAuth sign-in and confirm the return lands through a deep link instead of a browser tab that never comes back to the app.
That one test exposes the two failures that break converted web apps in production: sessions that evaporate on cold start, and redirects that dead-end outside the app.
To start with a second pair of eyes, you share your app's link and how to reach you, and the team tries the app and replies within two business days with how they would get it into the stores. That reply is usually where people discover their screen count.
<a id="add-native-value-so-apple-does-not-reject-it"></a>
Add Native Value So Apple Does Not Reject It
The wrapper pitch goes quiet at the point where Apple reads the binary. Two rules cause the issue. Guideline 4.2 says an app should include features, content, and user-interface elements that go beyond a simple website. Guideline 2.5.6 requires apps that browse the web to use the appropriate WebKit framework. Neither rule bans web content. Both rules make a bare WebView showing your Lovable URL a bad bet, according to the Apple App Store Review Guidelines.
The fix isn't cosmetic. Add capabilities the browser tab cannot deliver, and make each one work across phone sizes:
- Native navigation that matches platform back gestures and tab behavior instead of a hamburger menu borrowed from desktop.
- Push notifications tied to something the user chose, such as an appointment reminder, not a generic re-engagement blast.
- Offline and connection-loss handling, so a cached schedule opens on the subway and an error state replaces a blank spinner.
- Deep links that open a specific record and survive a cold start.
- Biometric re-entry for returning users, plus camera or barcode access where capture is part of the job.
- System sharing through the native sheet instead of a copied link.
Say you run a booking product. A build that only displays the web calendar is exactly the case reviewers reject. Add push reminders for upcoming appointments, a cached schedule that opens with no signal, and Face ID re-entry for a returning client, and the reviewer has three concrete reasons to approve.
Pick three or four features that sit on the core journey. A long list of shallow integrations reads as padding to a reviewer and as maintenance debt to you.
Then say it in the notes. Plainly: this app does X on mobile that the website cannot, and here is the screen where a reviewer sees it. Reviewers don't infer value, they look for it.
For Guideline 4.2 too-thin rejections, LetsDeployIt makes sure the app has real native value rather than being a thin wrapper, which is the same fix applied before submission instead of after a rejection. The breakdown of why Apple rejects AI-built apps is worth reading before you finalize a feature list, because most of those rejections are preventable in the build, not in an appeal.
<a id="how-to-rebuild-your-lovable-app-in-expo"></a>
How to Rebuild Your Lovable App in Expo
Treat this as a native UI and runtime migration, not a packaging step, which is how the Expo conversion walkthrough for a Vite, React and Supabase app frames it. The order below keeps the backend stable while the client changes underneath it.
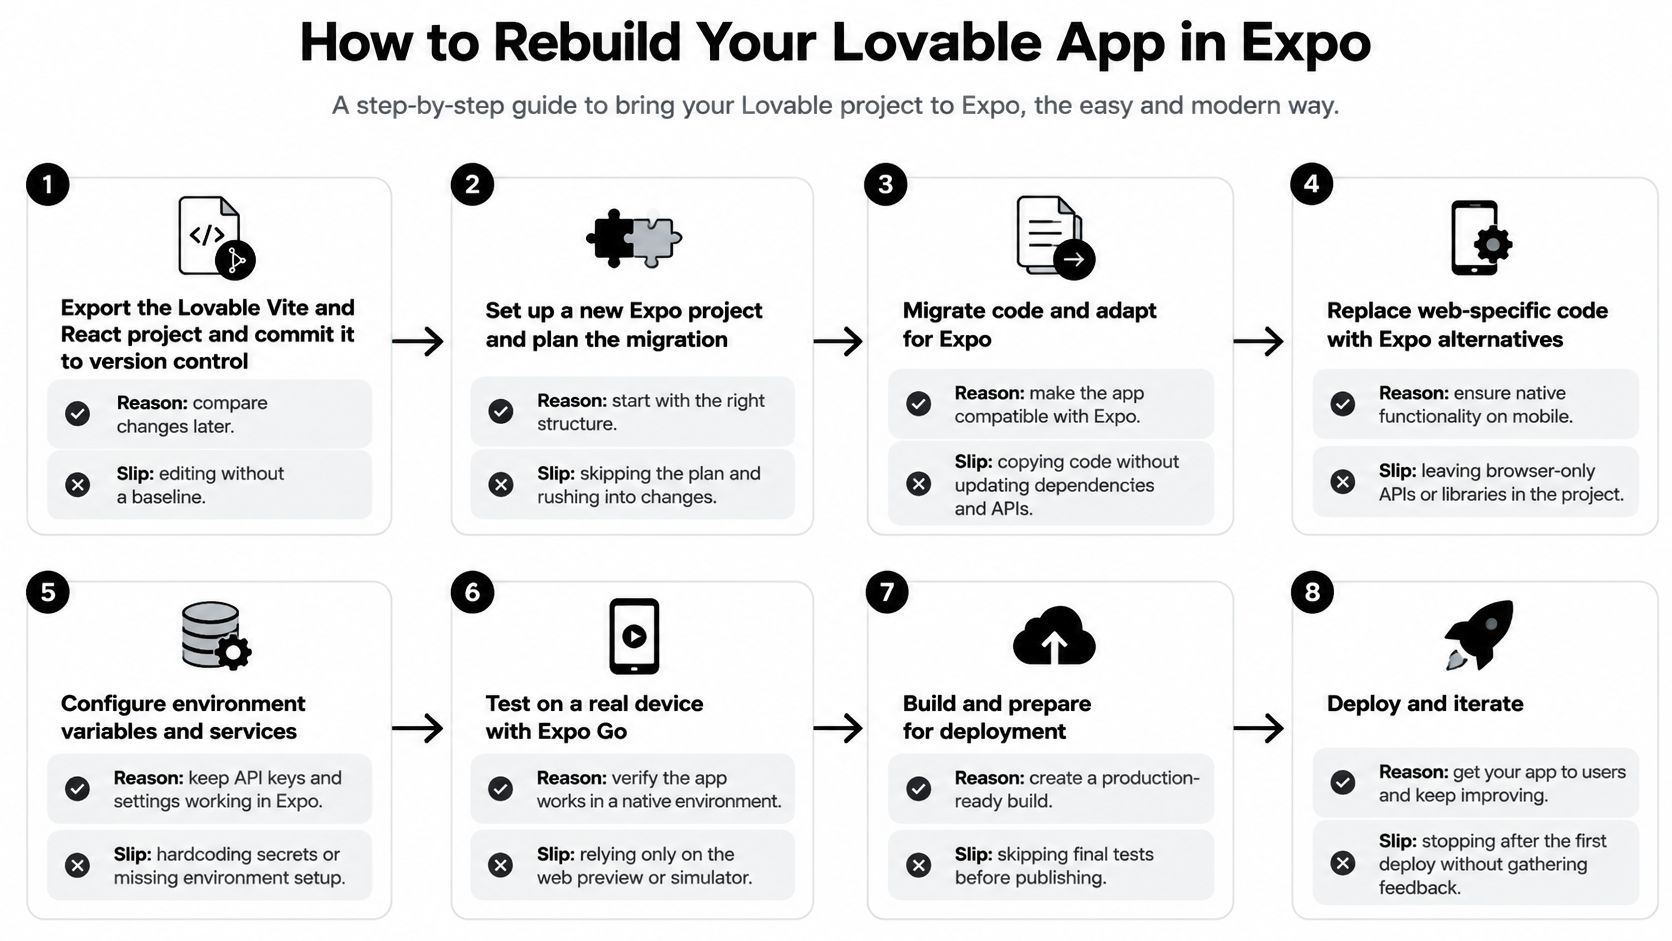
- Export and commit the Lovable project first. You need a baseline to diff against when something breaks two weeks in. The common slip is editing the only copy of the code in place and losing the ability to compare.
- Create a fresh TypeScript Expo project with Expo Router. File-based native navigation replaces browser routing entirely, so porting routes one to one is wasted effort. Start clean and re-derive the navigation from the user journeys.
- Port the data layer before the screens. Copy the Supabase queries, RPC names, table names, and RLS assumptions unchanged wherever you can, because a tested backend is one less variable while the interface is in flux. Changing both layers at once is how projects stall.
- Rebuild the screens with View, Text, TextInput, and FlatList. The reason is simple: div, span, input, and web lists have no native equivalent, and CSS layout doesn't survive the trip. The slip here is carrying desktop layout assumptions into small screens, where content overflows or disappears under the notch.
- Replace localStorage with AsyncStorage or MMKV. Sessions must survive a cold start, and the common mistake is assuming the web session will migrate. It won't, so plan a re-authentication path for existing users.
- Configure OAuth deep links and token refresh, then test sign-in on a real phone. Browser redirects don't return to a native app unless the deep link is registered correctly on both platforms. This is the step people test last and debug longest.
- Test on physical iOS and Android devices: keyboard behavior, safe areas, deep links, offline and error states, image permissions, token refresh, and small-screen layouts. A browser emulator will pass screens that fail on a mid-range Android phone, which is why it's the most expensive shortcut in the process.
- Build with EAS and verify the artifact you submit is the artifact you tested. Production builds pick up environment and signing differences that development builds hide. Confirm the build number, the bundle identity, and the signing profile before upload.
A working app looks unremarkable, which is the point. You sign in, move between screens without the keyboard covering the button, come back through a deep link into the right record, and the session is still there after you kill the app and reopen it. Everything else is polish on top of that loop.
<a id="store-requirements-and-google-play-testing-gate"></a>
Store Requirements and Google Play Testing Gate
Both stores want paperwork that has nothing to do with how good the code is. This is the checklist I hold a release against.
| Requirement | Apple App Store | Google Play |
|---|---|---|
| Developer account fee | $99 per year | $25 one-time |
| Privacy policy URL | Required | Required |
| Privacy disclosure | Privacy labels | Data safety form |
| Account deletion | Required if the app has accounts | Required if the app has accounts |
| Reviewer access | Demo credentials in review notes | Demo paths or credentials in the review details |
| Testing gate for new personal accounts | None | 12 testers opted in for 14 consecutive days |
Those account fees sit outside any conversion price, including ours: Apple Developer at $99 per year and Play Console at $25 one-time are paid to the stores directly.
The Google row is the schedule risk. Per Google Play's testing requirements, new personal developer accounts need at least 12 testers opted in continuously for 14 days before production access, and a tester who leaves early doesn't count. The 14 days must be consecutive. That's an explicit requirement, not a benchmark, so it belongs in the release plan before you upload anything.
The sequence that avoids a stalled window: create the signed EAS Android build, configure package identity and Play App Signing, upload to a closed testing track, recruit at least 12 testers across representative Android versions and screen sizes, verify their opt-in status, and watch crashes, authentication, notifications, deep links, and purchase flows for the full period. Keep a reserve of extra testers, because one opt-out can push you back to day zero. The guide to Lovable app Google Play closed testing covers the mechanics of running that window without losing days to admin.
Our Android closed testing add-on supplies 12 testers for 14 days, managed by the team, and it applies only to personal Play accounts. Organization accounts skip the gate entirely.
Before you hit submit: every requested permission maps to a visible feature, every screenshot matches the current build, and the binary in review is the one you tested. A functional app still gets delayed by a privacy policy URL that 404s or a reviewer login that expired.
<a id="choose-your-path-and-start-the-audit-this-week"></a>
Choose Your Path and Start the Audit This Week
Three moves, in order. Pick the path from the first table. Content-led app with a couple of device features: wrapper or PWA. Camera, push, offline, biometrics, or daily use: Expo rebuild. Run the screen audit and the sign-in check on your current build. That costs an afternoon and tells you exactly how many screens need rebuilding before you commit to a budget. Decide who does the mobile work. If you have an Expo developer, the numbered steps and the store checklist above are the whole plan.
If you want it handled, LetsDeployIt is a done-for-you App Store and Google Play submission service. You bring a working app and the team takes it through the native build, store assets, compliance, testing, and approval. Launch plans include fixing and resubmitting free until the app is approved. The Preview plan is free and includes full native conversion, a QR-code preview on your own phone, and editor access with unlimited edits and re-previews.
If you'd rather bring your own developer, Hire Developers is a practical way to find someone who has shipped React Native and handled a store submission before, which is a different skill from writing React on the web.
Start with the cheapest useful action this week: send the project link, or open your Supabase schema and auth flow and score every screen as keep or rebuild.
LetsDeployIt converts Lovable web apps into native React Native and Expo apps for iPhone and Android while keeping your existing backend, data, user accounts, and design, and it handles the store side end to end, including the 12-tester closed test for new personal Play accounts. You can see the converted app on your phone through a QR preview before paying anything. Send your project link at LetsDeployIt and the team will reply within two business days with how your app gets into both stores.
Want it in the stores without the guesswork?
A Lovable app runs in the browser, and the stores want a native build, signing, a listing and a review.
We handle it end to end. Flat $499.50 for both stores. Approved or your money back.