Lovable App Not Deploying? How to Fix Each Stage
Lovable app not deploying? Diagnose build, environment, hosting and store-review failures, then fix each one with clear checks.

Your Lovable preview works. You hit publish, open the live URL, and get a blank page or a broken login. Or you've moved toward a mobile launch, and now a build succeeds but nothing appears in TestFlight or Google Play.
A Lovable app not deploying isn't one problem. It's a symptom that can come from hosting, production configuration, native packaging, signing, or store review. The fastest fix starts with identifying which system rejected your app, not asking Lovable to rewrite code that already works.
Table of Contents
- Pinpoint the Stage Where Your Deployment Breaks
- How to Fix Failing Builds and Missing Environment Variables
- Hosting, Domain and Integration Settings That Block Live Deploys
- Store Requirements and Review Gates Before Launch
- Decide Whether to Fix the Build or Hand Off the Launch
<a id="pinpoint-the-stage-where-your-deployment-breaks"></a>
Pinpoint the Stage Where Your Deployment Breaks
| Stage | Typical symptom | First check |
|---|---|---|
| Web preview | Preview loads blank or throws errors | Browser console and the most recent edit |
| Web publishing (Lovable hosting, Vercel or Netlify) | 404 on refresh or deep links | Routing fallback and hosting target |
| Native build (Expo or EAS) | Build fails or stalls | Build log and dependency errors |
| Binary upload | Upload rejected or not processed | Bundle identifier, signing and package name |
| Store review | Rejected for metadata, policy or reviewer access | Rejection message and listing details |
Ask one diagnostic question: Does the failure happen in the browser, during the build, at upload, or after submission? Those locations identify different owners and different fixes.
If the preview itself fails, open the browser's developer tools and inspect the Console and Network tabs. Reproduce the error after the latest edit, then isolate the affected component or request. Don't change hosting settings to fix a JavaScript exception that also happens inside the editor.
If only the live URL fails, use Hosting, Domain and Integration Settings That Block Live Deploys. A successful homepage followed by a failed refresh on a nested route points toward request handling, while a login that returns to the wrong address points toward authentication configuration.
<a id="match-the-evidence-to-the-right-system"></a>
Match the evidence to the right system
For a native build failure, use How to Fix Failing Builds and Missing Environment Variables. Stay in the build logs until you know whether the failure concerns dependency installation, compilation, native configuration, or signing.
For an upload rejection or review rejection, use Store Requirements and Review Gates Before Launch. Upload errors concern the artifact and its identity. Review errors concern what reviewers can access, what the app does, and what you've declared about it.
A working preview proves only that the preview environment can run that version of your web app. It doesn't validate production hosting, native signing, store metadata, or reviewer access. Keep those boundaries explicit in your Lovable launch checklist, rather than treating publish as a single operation.
Practical rule: Change configuration in the system that produced the failure. Don't regenerate signing credentials because a web route returns a 404.
Write down the failing stage and its exact error message. Then jump to the matching fix and skip unrelated changes.
<a id="how-to-fix-failing-builds-and-missing-environment-variables"></a>
How to Fix Failing Builds and Missing Environment Variables
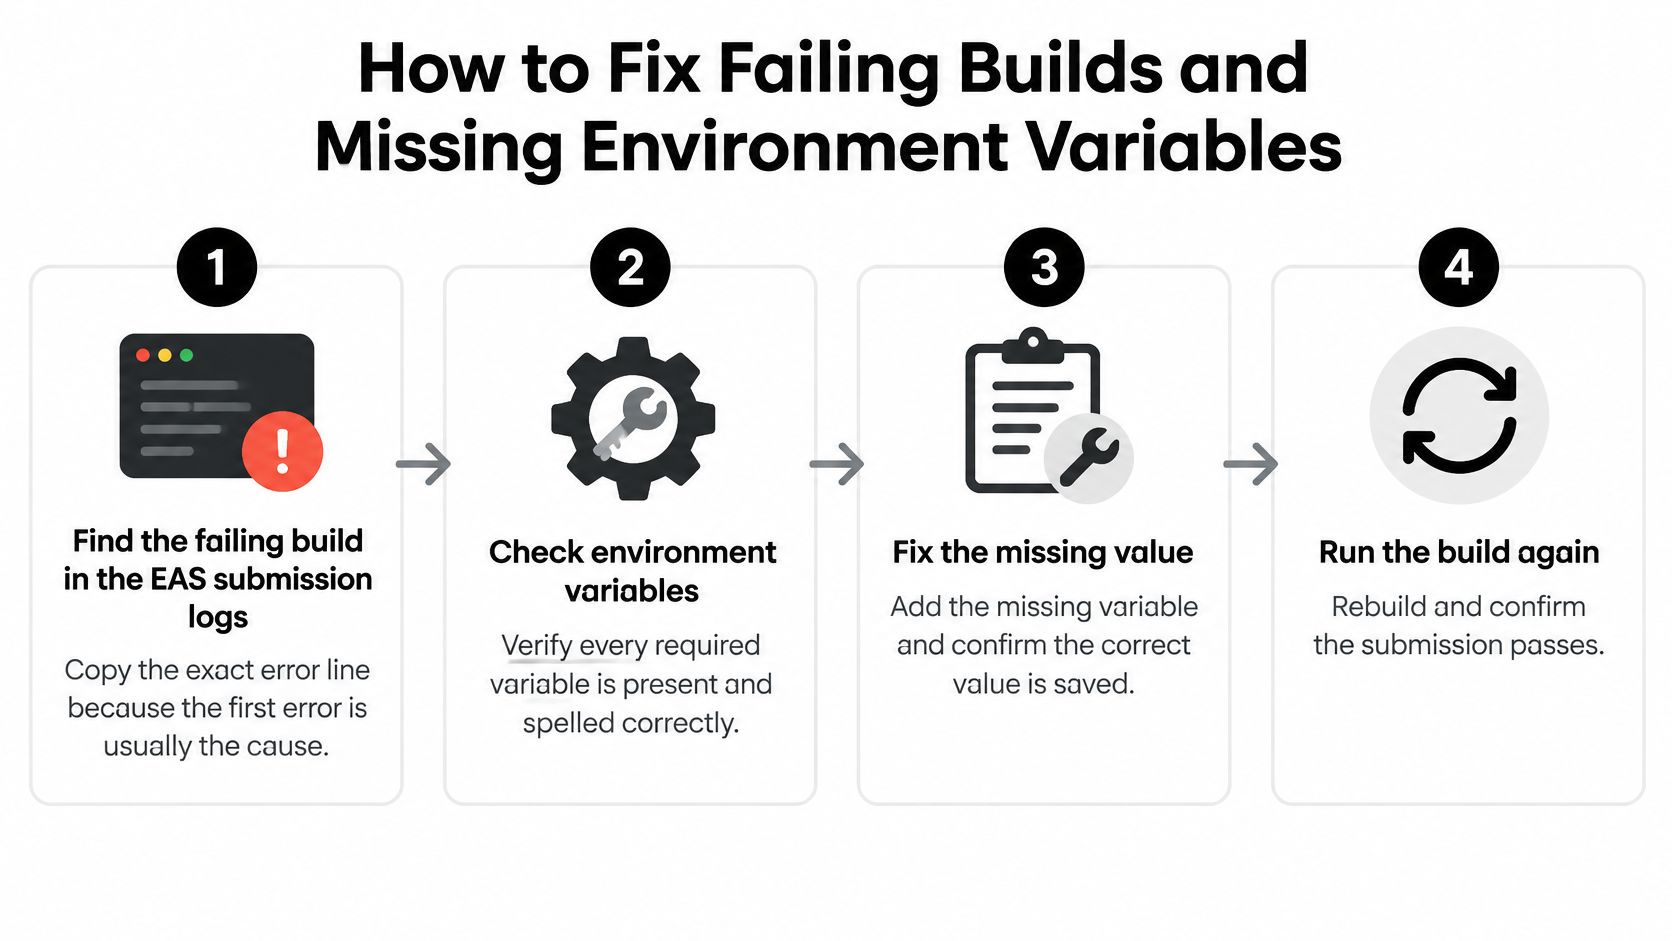
Treat build, signing, upload, processing, and review as separate operations. In particular, a submission log can explain an upload failure, but compilation errors belong in the associated build log.
<a id="fix-the-failure-in-a-controlled-sequence"></a>
Fix the failure in a controlled sequence
-
Capture the first actionable error. Open the failed EAS job, inspect its build output, and check submission details and annotations if submission was attempted. Copy the original error and surrounding output, because a final nonzero exit message usually tells you less than the earlier failed operation.
-
Check the production environment. Compare every variable the app reads with the variables available to the selected build profile, including the backend URL and public client keys. A missing value can survive compilation and cause a blank screen at launch, so verify spelling, environment selection, and whether the value is needed at build time or runtime.
-
Reproduce the production profile. Run the release build locally where supported, or use a clean CI job with the same dependency installation process and configuration. Test the resulting artifact on a clean device, not just a development session with cached credentials.
-
Resolve dependencies deliberately. Commit the intended lockfile, align incompatible package versions, and inspect native-module requirements before replacing packages. If a dependency requires native configuration your current workflow doesn't provide, either configure a supported native build or replace it; repeatedly reinstalling packages won't supply that configuration.
-
Record the attempt before retrying. Save the exact CLI output, commit SHA, profile name, artifact identifier, bundle version, and signing identity. Change one suspected cause at a time so you can tell which adjustment fixed the failure.
Logs come first because they identify the failed operation. Environment checks come next because configuration differences are easy to overlook; reproduction follows so you can investigate a specific hypothesis rather than rebuild blindly.
If you're choosing a repeatable CI setup, Grail Computer Labs' guide to build server hosting and testing options is useful context for deciding where builds and release tests should run.
<a id="know-when-the-build-is-actually-finished"></a>
Know when the build is actually finished
A clean build ends with a successful job and a downloadable artifact, not merely successful dependency installation. Before uploading, check the distribution signing setup and confirm that the artifact's identity belongs to the intended store application.
For production-only crashes, compare release configuration with development configuration. Inspect App Transport Security restrictions, certificate pinning, native-module autolinking, permissions, and architecture compatibility rather than assuming every blank screen means a missing variable.
After upload, allow for processing: the Expo app-store submission guide says an IPA typically becomes available in TestFlight after App Store Connect processing in around 10–15 minutes. Build selection, metadata, screenshots, and App Review submission still follow.
Rebuilding an artifact that uploaded successfully won't clear a processing delay. Confirm the failed stage before changing credentials or generating another release.
<a id="hosting-domain-and-integration-settings-that-block-live-deploys"></a>
Hosting, Domain and Integration Settings That Block Live Deploys
| Symptom | Likely cause | Fix |
|---|---|---|
| 404 on refresh or deep link | Client-side routing has no fallback | For a static single-page app, add a rewrite that sends application routes to index.html |
| Login redirects to localhost | Production domain missing from Supabase redirect URLs | Add the live domain to the allowed redirect list |
| Environment values undefined on the live site | Variables set only for the preview environment | Add them to the hosting provider and redeploy |
| Custom domain shows an old version | DNS records not updated or still propagating | Correct the records through your provider and allow time for propagation |
| Live app briefly unavailable | Platform incident | Check the status page and retry after the incident clears |
Start by opening the provider-generated deployment URL directly. If it works while the custom domain doesn't, investigate the domain connection before modifying application code.
For a routing failure, open a nested page in a private window, then refresh it. If navigation works from the homepage but a direct request fails, inspect how the host handles that route.
<a id="match-hosting-to-the-applications-output"></a>
Match hosting to the application's output
A static routing fallback isn't a universal deployment fix. It's appropriate when the build produces a static single-page app and the browser handles application routes. An application with server rendering or server functions needs a compatible runtime and deployment adapter instead.
Check the repository's actual build script and output, then compare them with the host's selected framework, build command, output directory, and deployed branch. Don't assume a successful build means the host knows how to serve its result.
For Supabase login failures, compare the configured site URL and allowed redirect destinations with the production address. Follow the complete sign-in flow in a private session so an existing login doesn't hide a broken callback.
Check frontend variables without exposing secrets. Public client configuration can be bundled into browser code, but privileged backend credentials must stay server-side.
<a id="separate-platform-disruption-from-project-failure"></a>
Separate platform disruption from project failure
When an unchanged deployment suddenly fails, check service status before editing the repository. Historical tracking from Outages.live recorded 31 incidents during a 90-day period, which makes intermittent disruption a plausible diagnostic branch, not proof that your particular failure is platform-wide.
Compare the timing with failures at connected services, including your Git provider and backend. If the platform reports an active incident, preserve the failed deployment details and retry after recovery rather than introducing unrelated code changes.
Routing and redirect corrections can be quick configuration edits. Domain propagation and provider recovery may take longer, and rebuilding won't accelerate either.
After changing deployment settings, trigger a fresh deployment and retest the exact failing URL or login path. A saved environment value doesn't retroactively replace configuration already embedded in a live build.
<a id="store-requirements-and-review-gates-before-launch"></a>
Store Requirements and Review Gates Before Launch
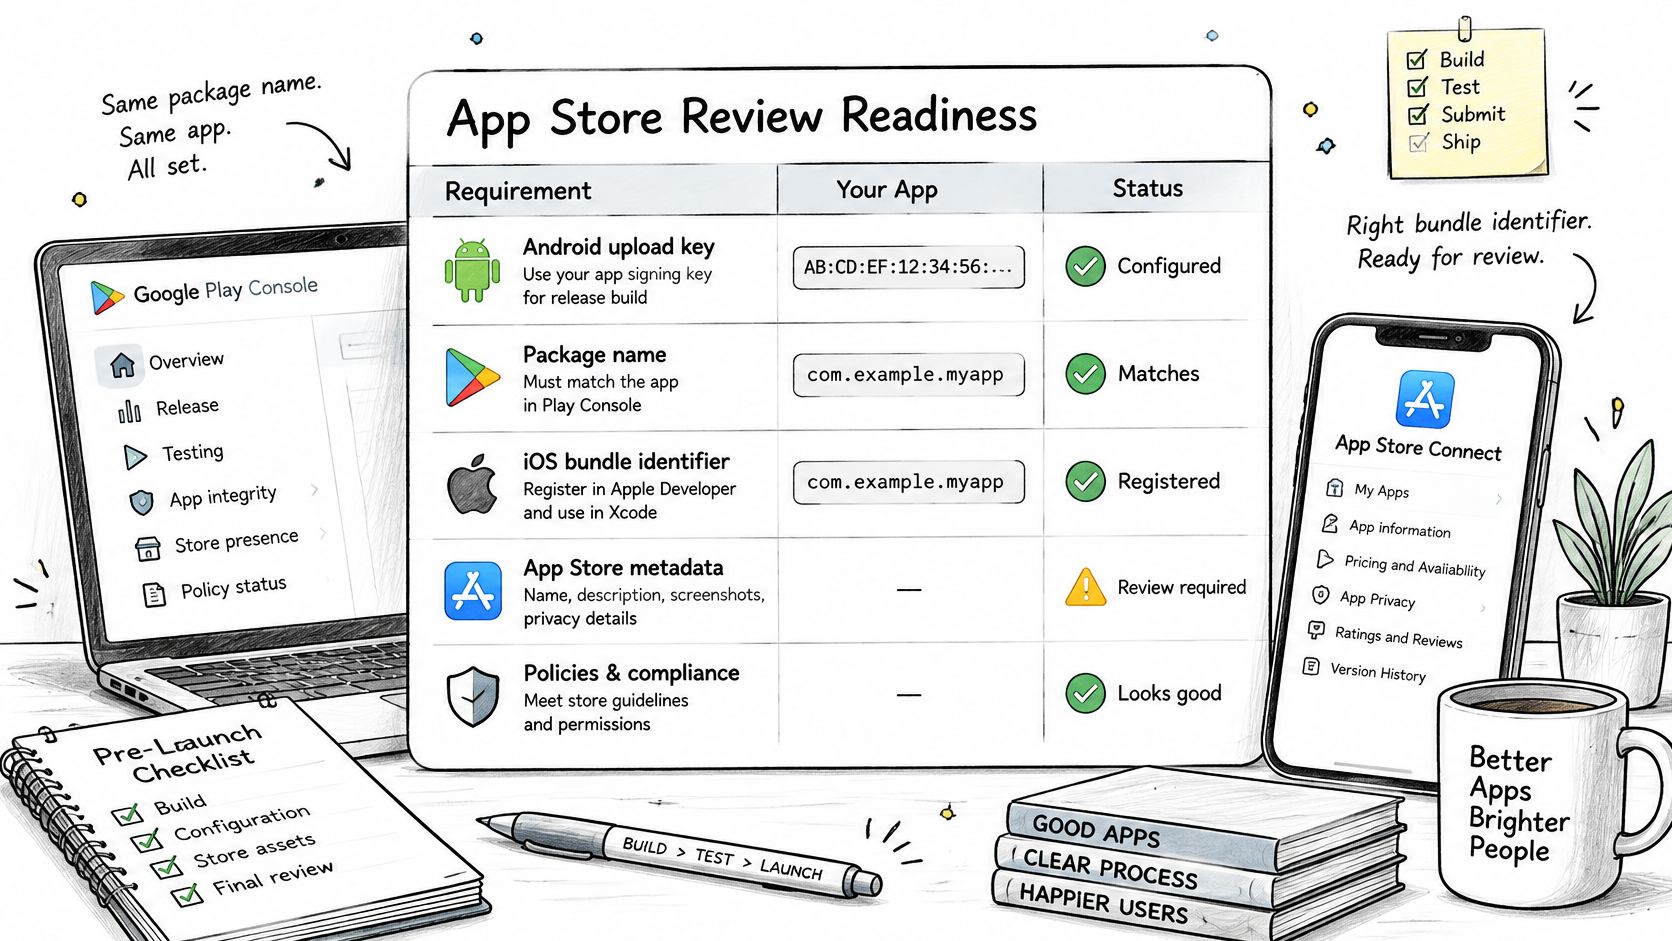
A published Lovable preview, a working native build, and a store-approved release are separate milestones. Check which one is blocked before changing code: a signing or account issue will not be fixed by rebuilding a web page.
| Requirement | Platform | Blocker if missing |
|---|---|---|
| Upload key and package name match the Play Console app | Android | Play rejects the bundle |
| Bundle identifier registered in App Store Connect | iOS | Upload isn't matched to the app |
| At least 12 testers continuously opted in for 14 days, for personal accounts created after November 13, 2023, under the Google Play production-access requirements | Android | No production access |
| Apple Developer membership at $99 per year | iOS | Required developer-account access for App Store distribution is missing |
| Play Console account with its $25 one-time fee | Android | Account can't publish |
| Completed Data Safety form | Android | Publishing stays blocked |
These are store release gates, not web deployment errors. Apple Developer and Play Console account fees aren't included in LetsDeployIt's launch price.
<a id="separate-web-publication-from-native-readiness"></a>
Separate web publication from native readiness
A Lovable project may have a published web URL and still need a native app, a signed binary, and store approval. Each stage has its own requirements.
For the React Native or Expo route, the web app must be converted or rebuilt as a native application. That means setting bundle identifiers, signing, icons, permissions, platform-specific behavior, and device testing. A native release is more than an export and upload.
The Self Made Newbie guide to Lovable export problems explains why resolving a web deployment issue does not by itself prepare an app for store review. A binary can compile while still lacking accurate privacy disclosures, usable screenshots, or reviewer access.
Apps built with Lovable, Bolt, FlutterFlow, Rork, RapidNative, or v0 can be shipped to the stores. The builder does not remove the need for a functional, policy-compliant native release. For common preparation steps, see this Lovable App Store checklist.
<a id="work-through-the-release-gates-in-order"></a>
Work through the release gates in order
-
Verify the signed artifact's identity. Check that the Android AAB uses the intended upload key and package name. For iOS, confirm the IPA's bundle identifier and distribution signing match the registered app.
-
Clear console blockers. Review the release track and Google Play's Publishing overview. Resolve blocking errors, including missing declarations and incomplete listing requirements, before attempting publication.
-
Test the submitted artifact. Install the signed release through its intended testing channel on representative devices and screen sizes. Check cold start, sign-in, deep links, permissions, offline behavior, push notifications, payments, and API failure states where applicable.
-
Verify testing access. If the account is subject to closed-testing requirements, confirm testers can reach and install the release. The test link may not be available immediately after publication, so verify access before counting the test period as underway.
-
Prepare a release evidence sheet. Record the version code or build version, environment selection, backend endpoint, reviewer credentials, privacy policy URL, and privacy disclosures. Generate screenshots from the submitted build, not an older preview.
LetsDeployIt's Android closed-testing add-on provides and manages 12 testers for 14 days. It is available only for personal Play accounts. You still need a working release and accurate account information.
Test reviewer credentials yourself: sign out, use the supplied account, and confirm reviewers can reach the features described in the listing. Invitation-only onboarding should not leave reviewers waiting for access.
A successful local build does not prove the app is ready for release. Submit when the signed artifact works, required declarations are complete, and the console has no blocking errors. If the store rejects the app, address the stated reason before resubmitting.
<a id="decide-whether-to-fix-the-build-or-hand-off-the-launch"></a>
Decide Whether to Fix the Build or Hand Off the Launch
Keep troubleshooting yourself when you have a specific error, can reproduce it, and control the relevant configuration. A dependency conflict with a clear package name is a bounded engineering task. So is an upload rejection that identifies a mismatched application identifier.
A hand-off makes more sense when review objections repeat despite targeted fixes, when the product still behaves like a thin web-view wrapper, or when coordinating testing, assets, compliance, and reviewer replies matters more than learning the submission process.
<a id="choose-based-on-the-remaining-work"></a>
Choose based on the remaining work
- Keep ownership of a narrow fix. If you can explain the failure and verify the correction, finish that task before paying someone to investigate it again.
- Delegate a launch process. If the remaining work spans native packaging, store documentation, testing, and review responses, evaluate an app deployment service against that full scope.
- Preserve account control. You must own your Apple Developer and Google Play Console accounts and grant the access needed for submission.
At LetsDeployIt, we take a working app and handle the native build, assets, compliance, testing, and approval process for React Native and Expo releases, including apps originating in Lovable. Our target is 3 to 4 weeks from kickoff to live, but Apple and Google control review timing.
Launch plans include fixing and resubmitting free until approval. Developer-account fees and ongoing infrastructure costs aren't included.
Confirm your failing stage, complete the matching targeted fix, and then decide whether the remaining work is debugging or launch operations. That distinction keeps a store-review problem from becoming an unnecessary application rewrite.
If your Lovable app works but native packaging or store submission is blocking launch, LetsDeployIt can handle the build, testing, assets, compliance, and submission process. Visit LetsDeployIt with your working app and the exact error or rejection message so we can assess what's needed to get it into the stores.
Want it in the stores without the guesswork?
A Lovable app runs in the browser, and the stores want a native build, signing, a listing and a review.
We handle it end to end. Flat $499.50 for both stores. Approved or your money back.