Mobile App Quality Assurance Testing: A Practical 2026 Guide
Learn mobile app quality assurance testing with this practical 2026 guide covering test types, automation, device strategy, CI/CD, and launch readiness.

You're three days from a release, the build installs, the happy-path smoke test passes, and then reality shows up. A reviewer can't get through sign-in because the demo account wasn't wired correctly, or a slow Android device turns your clean login screen into a spinner that never really recovers. Mobile app quality assurance testing exists to stop that exact kind of release-day surprise, not by chasing every possible bug, but by making sure the app survives real devices, real network conditions, and real store rules.
The teams that do this well don't ask, “Did the test pass?” first. They ask, “What can break this release, who will see it, and how do we catch it before the store or users do?” That's the practical difference between looking busy in QA and reducing release risk.
Table of Contents
- What Mobile App Quality Assurance Testing Solves
- How Modern Mobile QA Is Measured by Stability, Not Test Counts
- The Core Test Types and What Each Layer Catches
- Building a Device Matrix That Reflects Real Users
- Where Automation Wins and Where Manual Testing Still Matters
- Plugging QA Into CI/CD and the Submission Pipeline
- Metrics That Predict Approval and Post-Launch Stability
- Pre-Launch Checklist for Store Compliance and Launch Readiness
<a id="what-mobile-app-quality-assurance-testing-solves"></a>
What Mobile App Quality Assurance Testing Solves
A React Native or Expo app can look finished in development and still fail at the worst possible moment. The install works, the screenshots are polished, and the demo on a fast phone feels fine. Then App Review rejects it for a missing privacy label, or a real customer on an older Android device opens login and the app slows down enough to feel broken.
<a id="three-failure-modes-show-up-again-and-again"></a>
Three failure modes show up again and again
Functional defects are the obvious ones, the button does the wrong thing, the checkout flow drops a field, or the app signs out when it should keep the user in. These bugs are painful, but they are also visible, which makes them easier to reproduce and fix.
Performance and stability defects are harder to ignore because they hide behind “it works on my phone.” Google Play Console now exposes crash and user-perceived crash rates directly, and it defines bad behavior territory when at least 1.09% of daily active users experience a user-perceived crash across all device models, or 8% on a single device model, which turns release quality into a measurable benchmark rather than a hunch (Google Play crash vitals).
Compliance defects can block the release before users ever see it. Missing privacy disclosures, incorrect data handling statements, broken reviewer notes, or a sign-in flow that cannot be completed by a reviewer on a clean device all stop a launch just as effectively as a code crash.
Practical rule: QA should protect the release from the things that kill it fastest, not from every low-value edge case your team can imagine.
<a id="what-good-qa-does"></a>
What good QA does
Good mobile QA decides where the release is most exposed and puts the strongest checks there. That means testing the flows users depend on, the devices most likely to fail, and the store requirements most likely to trigger rejection. It also means accepting that you cannot fully test everything, so you choose the combinations that matter most for this release.
In practice, that changes the job. QA is not a final pass over a finished app. It is the system that tells the team whether the app is safe to ship, safe to review, and safe to keep in users' hands after launch.
<a id="how-modern-mobile-qa-is-measured-by-stability-not-test-counts"></a>
How Modern Mobile QA Is Measured by Stability, Not Test Counts
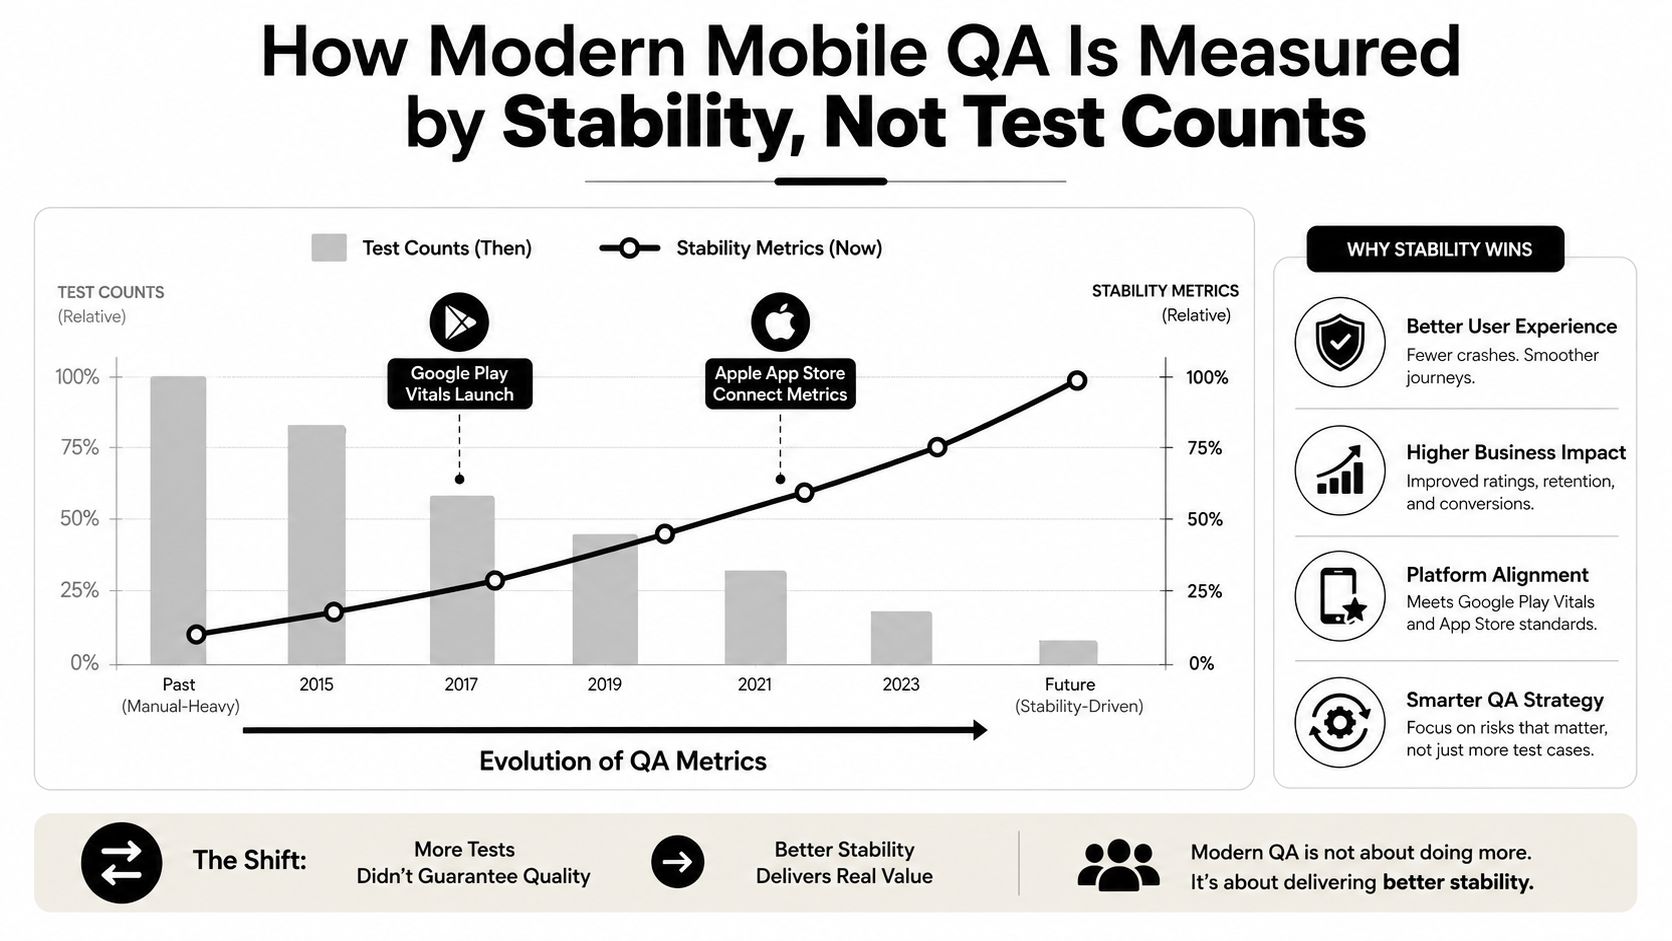
A team can ship a build with a long test report and still end up with a fragile app in production. That is the part many QA discussions miss. The question is whether the release stays stable after it hits real devices, real networks, and real user behavior, because those conditions expose defects that a clean test run can hide.
<a id="the-platform-now-sets-the-quality-bar"></a>
The platform now sets the quality bar
As noted above, Google Play Console exposes crash and user-perceived crash rates, and Android Studio's App Quality Insights brings that signal into the development workflow. The practical result is that stability stops being a post-launch surprise and becomes something the team can watch while the release is still moving through review and rollout. A build can clear the planned checks and still miss the platform's stability expectations once users start touching it.
That changes how I judge a release. A passing suite proves the suite passed. It does not prove the app behaves well after install, after backgrounding, after a weak network handoff, or after an operating-system-specific edge case. The release decision has to account for both layers, first whether the app installs and clears the intended tests, then whether production stability stays inside the platform's crash thresholds once usage begins.
<a id="why-dashboard-language-replaced-bug-count-language"></a>
Why dashboard language replaced bug-count language
Once crash-free sessions and user-perceived crash rates are visible, the conversation becomes sharper. Teams stop arguing about whether the app “feels stable” and start asking which device family is drifting, which build introduced the regression, and which flow is dragging the numbers down. That is a better use of QA time because it points to a release choice, hold the rollout, fix the build, or narrow the affected segment.
The old pass-fail mindset still has a job in local checks and regression gates. It just cannot carry the full decision anymore. Test counts say how much was exercised. Stability metrics say whether the app is holding up where it matters, in the hands of users.
<a id="what-testers-do-differently-now"></a>
What testers do differently now
Testers spend less energy proving that one happy path works and more time checking whether the app stays stable under messy conditions. They compare release candidates against known stability thresholds, watch for device-specific patterns, and treat production telemetry as part of the test surface. That is the shift that matters in mobile QA. The goal is to make better release decisions, using evidence from the build itself and from what happens after launch.
<a id="the-core-test-types-and-what-each-layer-catches"></a>
The Core Test Types and What Each Layer Catches
The mistake teams often make is treating every test type as if it does the same job. It doesn't. Each layer catches a different class of defect, and each layer misses something important. If you know those trade-offs, you can build a QA stack that's leaner and far more honest.
<a id="mobile-qa-test-layers-compared"></a>
Mobile QA test layers compared
| Test Layer | Best At Catching | Commonly Misses | Typical Speed |
|---|---|---|---|
| Unit tests | Logic errors, validation mistakes, calculation bugs | Device behavior, network issues, UI breaks | Fast |
| Integration tests | API contract problems, storage issues, state transitions | Visual regressions, device-specific quirks | Medium |
| UI and E2E tests | Broken flows, missing screens, navigation failures | Subtle performance issues, deep edge cases | Slower |
| Real-device soak tests | Memory leaks, backgrounding problems, long-session instability | Fine-grained logic defects | Slower |
| Manual exploratory testing | Usability friction, confusing interactions, odd edge cases | Broad repeatability at scale | Variable |
<a id="start-at-the-bottom-but-dont-stop-there"></a>
Start at the bottom, but don't stop there
Unit tests should catch the logic you can trust a machine to verify. If a pricing rule rounds incorrectly, a validation rule rejects a good input, or a state machine lands in the wrong state, that belongs in unit coverage. These tests are fast, easy to repeat, and cheap to maintain.
Integration tests are where mobile apps often break in less glamorous ways. Auth tokens expire, local storage desynchronizes, a payment adapter returns an unexpected response, or a sync flow behaves differently after the app resumes. These are the defects that unit tests can't see and full UI tests are often too slow to isolate cleanly.
A good QA stack doesn't try to make one layer do every job. It gives each layer one clear purpose and leaves the rest alone.
<a id="the-checkout-example-makes-the-difference-obvious"></a>
The checkout example makes the difference obvious
A unit test can catch a rounding bug before a customer sees the wrong total. A UI test can catch a Pay button that disappears or becomes untappable on a small Android device. A real-device soak test can catch the memory leak that only appears after the app has been backgrounded, reopened, and kept alive long enough for resources to pile up.
That's why the best teams sequence tests inside a sprint instead of treating them as independent rituals. Fast checks run first, medium checks validate contracts and flows, and slower device tests protect the high-risk release paths. If the checkout flow is the business-critical path, it deserves all three layers, not one generic “end-to-end” label.
<a id="what-not-to-overbuild"></a>
What not to overbuild
Don't turn every screen into an E2E script. Those suites get brittle fast, and brittle suites train teams to ignore failures. Focus the expensive automation on the flows that matter most, then use targeted manual testing where human judgment is better than scripting.
<a id="building-a-device-matrix-that-reflects-real-users"></a>
Building a Device Matrix That Reflects Real Users
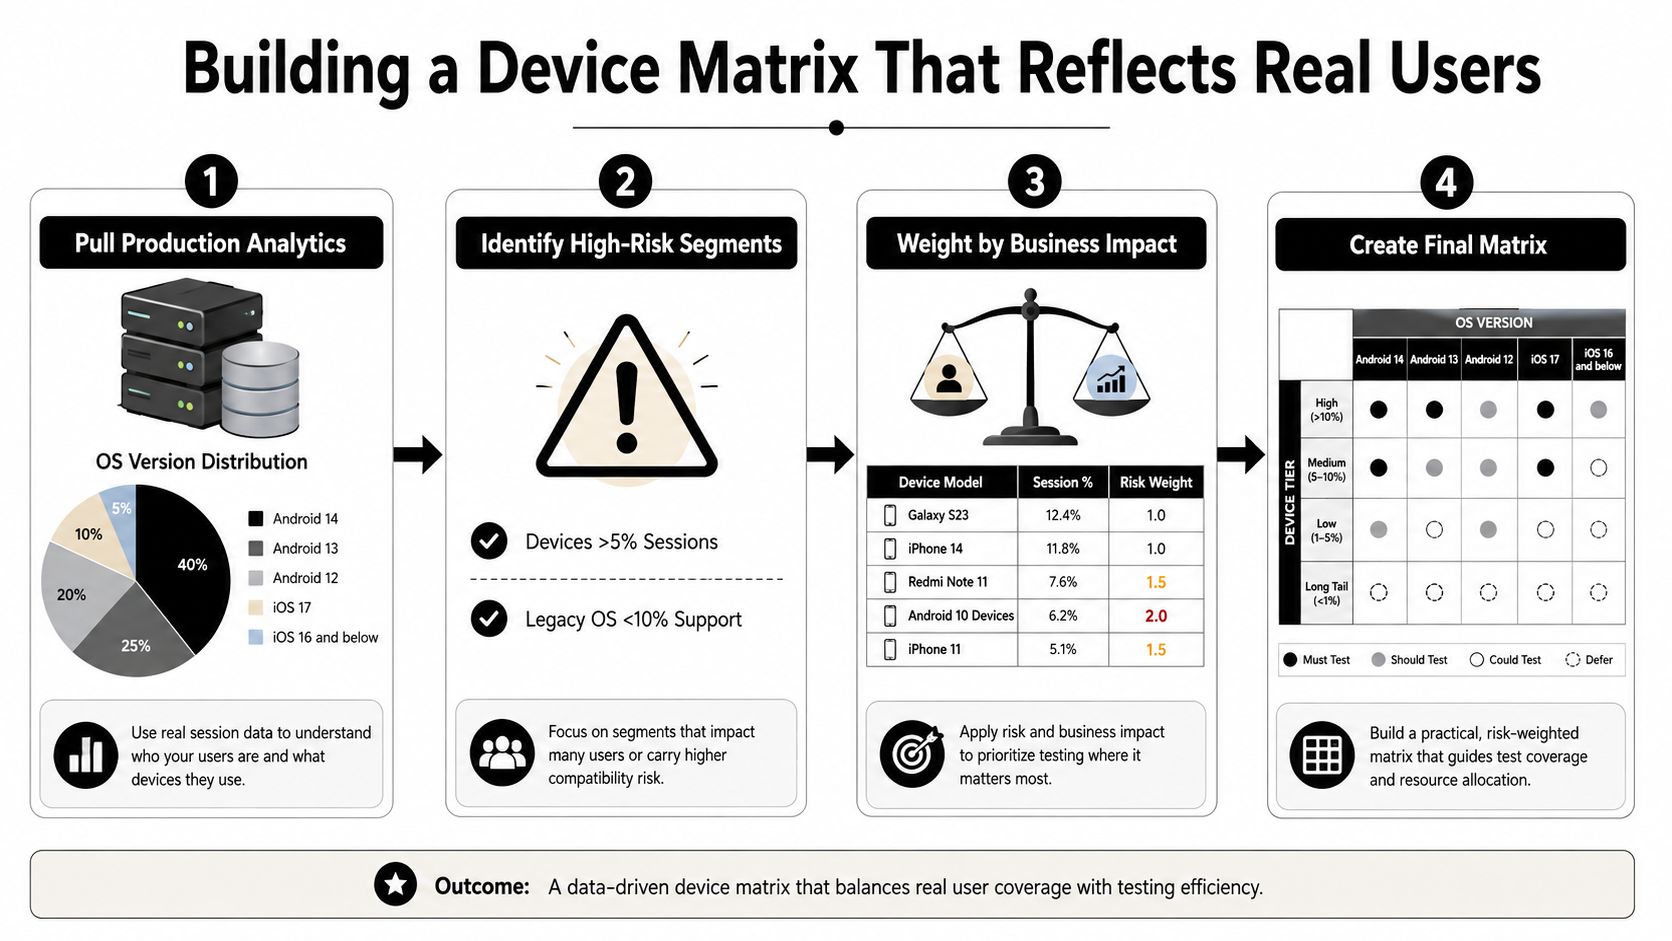
Most device matrices fail before the first test run because they're copied from a vendor list instead of built from usage data. That feels thorough, but it's usually wasteful. A useful matrix starts with production analytics, then weights devices by how much business risk they carry.
<a id="build-the-matrix-from-the-app-people-actually-use"></a>
Build the matrix from the app people actually use
A risk-based approach means looking at session volume first, then crash history, then device and OS spread. One practical guide recommends weighting the device matrix by session volume and crash rate, covering at least one device per major manufacturer, and prioritizing automated E2E regression on revenue-critical flows such as login, onboarding, and checkout (mobile testing guide).
That approach is better than a generic compatibility list because it ties test effort to user impact. If a device model appears often and has a bad crash history, it belongs in the matrix. If a model barely shows up and hasn't created instability, it probably doesn't deserve the same attention.
<a id="keep-the-matrix-small-enough-to-use"></a>
Keep the matrix small enough to use
A useful matrix is not a museum of every handset your team has ever seen. It's a shortlist that helps the team make decisions. For most releases, that means picking enough devices to represent the common failure modes, the key manufacturers, and the OS range you support, then making sure the slow and low-memory devices are included on purpose.
Practical rule: If the device won't change the release decision, don't make it part of the mandatory matrix.
<a id="the-historical-testing-gap-explains-why-this-matters"></a>
The historical testing gap explains why this matters
One empirical study of Android apps found that the average number of test suites was 3.24 with a median of 0, the average number of test cases was 63.30 with a median of 5, and 60% of apps had no tests at all (Android app testing study). Those numbers matter because they show how easy it is for mobile QA to stay shallow unless the team intentionally builds coverage around real risk.
That same logic applies to devices. If your matrix is based on habit, it'll miss the devices that matter. If it's based on production analytics, it'll catch more of the failures that affect users.
<a id="what-to-read-in-the-dashboards"></a>
What to read in the dashboards
Use Play Console device reports and App Store analytics to see where the app is unstable in the wild. Then update the matrix after each release cycle, especially if a new device class, OS version, or performance tier starts generating support noise. The matrix should evolve with your audience, not with the preferences of the QA room.
<a id="where-automation-wins-and-where-manual-testing-still-matters"></a>
Where Automation Wins and Where Manual Testing Still Matters
Automation is not a moral upgrade over manual testing. It's a trade-off. Use it where the flow is repetitive, critical, and worth protecting every build. Keep manual effort for areas where human judgment still catches more than scripts do.
<a id="automate-the-flows-that-hurt-when-they-break"></a>
Automate the flows that hurt when they break
Login, onboarding, checkout, subscription management, and account recovery are the obvious candidates. If these flows fail, the app can still “work” in a technical sense while losing users or revenue immediately. Automated end-to-end regression pays off here because the same risk returns every release.
Automation also makes sense for repeated checks that don't benefit from human interpretation. If you're validating the same auth flow on the same key devices, doing it by hand every sprint is a bad use of QA time. The machine should carry that load.
<a id="keep-manual-testing-where-the-app-still-changes-shape"></a>
Keep manual testing where the app still changes shape
Exploratory testing still matters for new features, UI polish, accessibility review, and edge cases that shift from release to release. A human tester notices awkward transitions, confusing wording, poor visual hierarchy, and friction that no scripted assertion will flag cleanly. That's especially true in mobile, where gesture behavior and layout feel can make an otherwise correct screen unusable.
A balanced team usually runs automation for protection and manual sessions for discovery. The manual pass should be deliberate, not random. Give it a clear focus, a time box, and a target risk area, then stop. Otherwise, manual testing turns into a vague sweep that feels productive and leaves little behind except fatigue.
<a id="pick-tools-that-match-the-app-and-the-team"></a>
Pick tools that match the app and the team
Framework choice should follow architecture and maintenance reality. Detox is often a strong fit for React Native flows that need tight control. Maestro works well when the team wants readable, flow-oriented tests without a heavy scripting burden. Appium remains useful when cross-platform breadth matters more than speed or simplicity.
The best tool is the one your team will maintain after the first release rush. If the suite depends on one person's tribal knowledge, it will degrade. If the framework matches the app and the team's skill set, it becomes part of normal delivery instead of a special project.
<a id="a-simple-decision-rule-helps"></a>
A simple decision rule helps
Automate when the flow is critical, repeatable, and expensive to fail.
Keep it manual when the feature is new, visually nuanced, or still changing too fast for stable scripts.
That rule saves a lot of wasted effort. It also keeps the suite focused on what protects the release.
<a id="plugging-qa-into-cicd-and-the-submission-pipeline"></a>
Plugging QA Into CI/CD and the Submission Pipeline
QA becomes useful when it runs at the moment risk is introduced, not a week after. That means the pipeline needs to do more than build binaries. It has to tell you whether the change is safe to merge, safe to promote, and safe to submit.
<a id="put-the-right-checks-at-the-right-stage"></a>
Put the right checks at the right stage
Pre-merge checks should be fast and deterministic. Run linting, unit tests, and targeted integration tests before the change lands. Those checks are your first filter, and they should fail quickly when the code is obviously wrong.
After merge, widen the net. Build the app, execute smoke tests, and run a broader regression slice on realistic environments. This is the point at which you catch the mistakes that appear only once the app is assembled with the rest of the release.
Before submission, add gates that reflect store risk. Reviewer notes, screenshot generation, permission prompts, privacy text, and demo credentials should all be validated as part of the release path, not handled in a separate checklist buried in a document nobody opens.
<a id="make-the-pipeline-refuse-bad-releases"></a>
Make the pipeline refuse bad releases
A good mobile pipeline doesn't just report pass or fail. It blocks promotion when the build fails your own quality bar. That may be a crash-free session threshold, a failed smoke test, a missing compliance artifact, or a broken submission asset. If a release can still go out after failing a known quality gate, then the gate is just decoration.
If the pipeline doesn't change the decision, it isn't a gate. It's a log.
<a id="use-the-release-tools-as-part-of-qa-not-apart-from-it"></a>
Use the release tools as part of QA, not apart from it
EAS Build and Submit fit neatly into a mobile workflow because they connect build, signing, and submission steps. GitHub Actions and Bitrise can then orchestrate the tests, validations, and promotion rules around that pipeline. The value isn't the tool name. The value is that every build passes through the same quality logic, every time.
That also makes release recovery easier. If a bad build slips through, the team already has the scripts, assets, and checks needed to reproduce the problem and push a fix through the same path. The pipeline becomes both the release mechanism and the quality record.
<a id="metrics-that-predict-approval-and-post-launch-stability"></a>
Metrics That Predict Approval and Post-Launch Stability
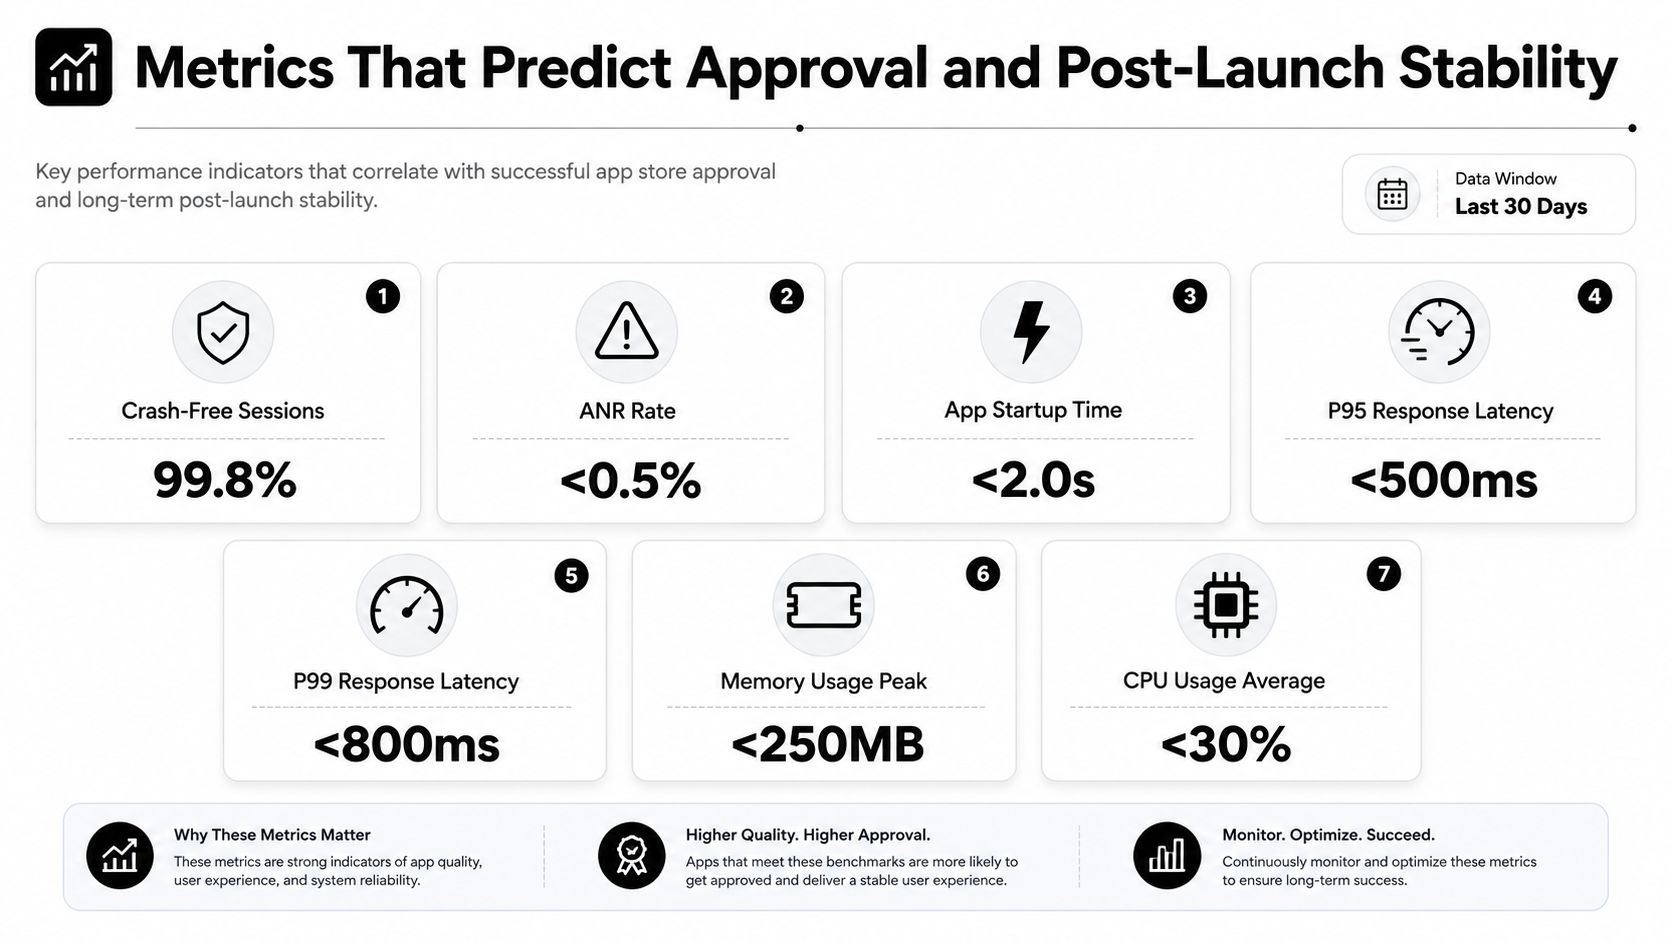
If a dashboard only tracks test counts, it obscures the true release risk. The metrics that matter are the ones that predict whether the app gets approved, stays stable, and keeps working after launch.
<a id="watch-the-metrics-that-map-to-user-pain"></a>
Watch the metrics that map to user pain
The release-quality metrics I trust most are app startup time, p95 and p99 response latency, memory and CPU usage, battery drain, crash-free sessions, and ANR rates. Mobile failures usually surface first as slowness, lockups, or resource drain, long before they show up as a clean crash.
That matters even more under degraded networks, background interruptions, and long-running sessions. Those are the conditions where real users find defects that a clean lab run can miss, as covered in the guidance on mobile testing metrics guidance. If the app looks fine on Wi-Fi in a quiet office but falls apart on poor connectivity, the dashboard should make that gap obvious.
<a id="use-each-metric-to-make-a-decision"></a>
Use each metric to make a decision
Crash-free sessions tell you whether the app is stable enough to trust.
ANR rates show whether the app is freezing in ways users will feel immediately.
Startup time shows whether first launch is acceptable or already hurting retention.
p95 and p99 latency show whether the tail is getting worse, even if the average still looks fine.
Memory and CPU usage show whether the app is slowly wearing down the device.
The decision is not always to block a release. A spike can be acceptable if it stays isolated to one device class and does not affect the core flow. The point is to make that call on purpose, using the data instead of instinct.
<a id="separate-device-specific-noise-from-a-real-regression"></a>
Separate device-specific noise from a real regression
As noted earlier, Android Studio's App Quality Insights helps distinguish device-specific noise from a broader product regression. That matters because a crash on one model calls for a different response than a problem that spreads across the release line. One is usually a targeted compatibility issue, the other is a release-level failure.
A good dashboard is small, current, and tied to a decision. If the numbers do not tell you whether to pause, ship, or investigate, they are just decoration.
<a id="pre-launch-checklist-for-store-compliance-and-launch-readiness"></a>
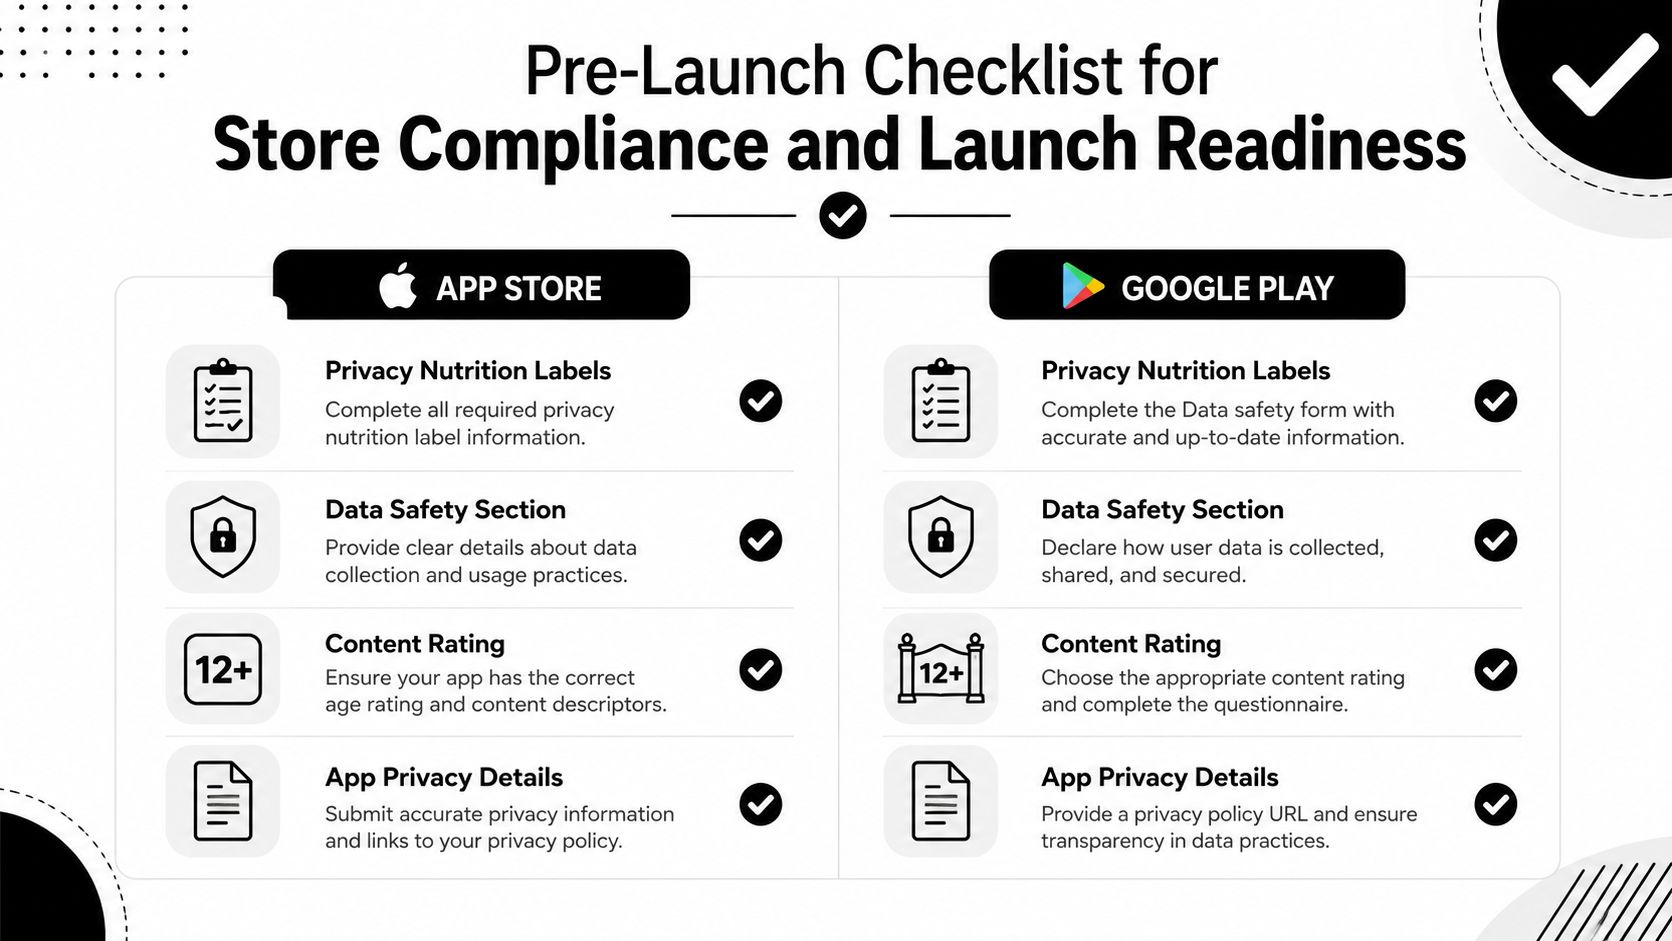
Pre-Launch Checklist for Store Compliance and Launch Readiness
The final 72 hours before submission should feel boring. If they feel chaotic, something upstream is missing. The safest launch process is a repeatable checklist that covers store policy, reviewer access, device coverage, and the app's first-run experience.
<a id="what-must-be-ready-before-submission"></a>
What must be ready before submission
Privacy and disclosure assets need to match what the app does. On Apple, that means the privacy nutrition labels are consistent with behavior. On Google Play, the data safety section needs to reflect the same reality.
Reviewer access has to be frictionless. If the app needs an account, a role, or a gated flow, give the reviewer exactly what they need to get through it without guesswork. Broken sign-in is one of the fastest ways to turn a good build into a rejection.
Screenshots and listings should cover the required device sizes and the actual UI state users will see. Don't reuse stale assets from a previous version if the layout has changed. Mismatched screenshots make the store page look careless, which is a bad look during review.
<a id="handle-the-platform-specific-submission-requirements"></a>
Handle the platform-specific submission requirements
Google Play adds another layer for new accounts. The closed test requirement means new Play Console accounts need a 14-day closed test path, and that has to be planned before the team gets close to launch. If you ignore that requirement until the end, you'll burn time you don't have.
App Store review also punishes broken first impressions. A crash on first launch, placeholder content, or a dead-end onboarding screen can sink the submission before anyone gets to the actual value of the app. Those are not edge cases. They're launch blockers.
<a id="use-the-checklist-as-a-final-gate-not-a-memory-aid"></a>
Use the checklist as a final gate, not a memory aid
A practical release checklist should cover:
- Privacy URLs and policy pages: Confirm they're live, reachable, and consistent with the app's actual behavior.
- Data safety and disclosure answers: Make sure every field matches the current build, not last month's implementation.
- Demo account credentials: Test them on a clean device, then retest them after the build is signed.
- Reviewer notes: Explain unusual flows, account setup, test paths, and anything the reviewer won't discover naturally.
- Store screenshots and metadata: Verify they match current UI, supported devices, and current feature names.
- First-run and sign-in flow: Run the exact path a reviewer will use, on a fresh install, with no cached state.
- Crash checks on launch: Open the app cold, background it, resume it, and watch for immediate instability.
That checklist is where a release becomes real. If every item is ready, submission is a process. If even one item is missing, launch turns into a support problem.
If you want a team that handles the store-specific side of launch without turning product QA into paperwork, visit LetsDeployIt. They focus on getting React Native and Expo apps through Apple App Store and Google Play review with the assets, reviewer notes, and submission handling that mobile launches usually trip over.