How to Publish React Native App to Stores in 2026
Learn to publish React Native app on the App Store and Google Play in 2026. Covers EAS builds, signing, and store listing tips.

You've got the app working, the last bug is patched, and the team's already talking about launch. Then the first store submission lands in review, and a day later the rejection email arrives because a screenshot, entitlement, signing artifact, or reviewer note didn't line up with what the store expected. That's the part many teams underestimate, publishing a React Native app isn't a single upload, it's an operational chain with a lot of places to fail.
React Native is still a meaningful part of the mobile market, not a side experiment. In the 2024 State of React Native survey, React Native appeared in 6.81% of Android apps overall and represented 4.24% of installs. Among top apps, that rose to 13.44% of apps and 19.11% of installs, and the same dataset shows React Native in 3.90% of new apps. AppBrain's React Native library stats make the point plainly, you're shipping into a proven, competitive distribution channel where execution still decides whether you land in the crowded middle or among the apps people keep.
Table of Contents
- Why Publishing a React Native App Is Harder Than It Looks
- Signing Your App Without Losing a Weekend to Keychain
- Setting Up App Store Connect and Google Play Console the Right Way
- Compliance, Privacy, and the Data Safety Questionnaire
- Common Rejection Reasons and Exactly How to Fix Them
- Release Strategies, Phased Rollouts, and the New Closed-Test Rule
- Realistic Timelines and When a Launch Service Actually Pays Off
<a id="why-publishing-a-react-native-app-is-harder-than-it-looks"></a>
Why Publishing a React Native App Is Harder Than It Looks
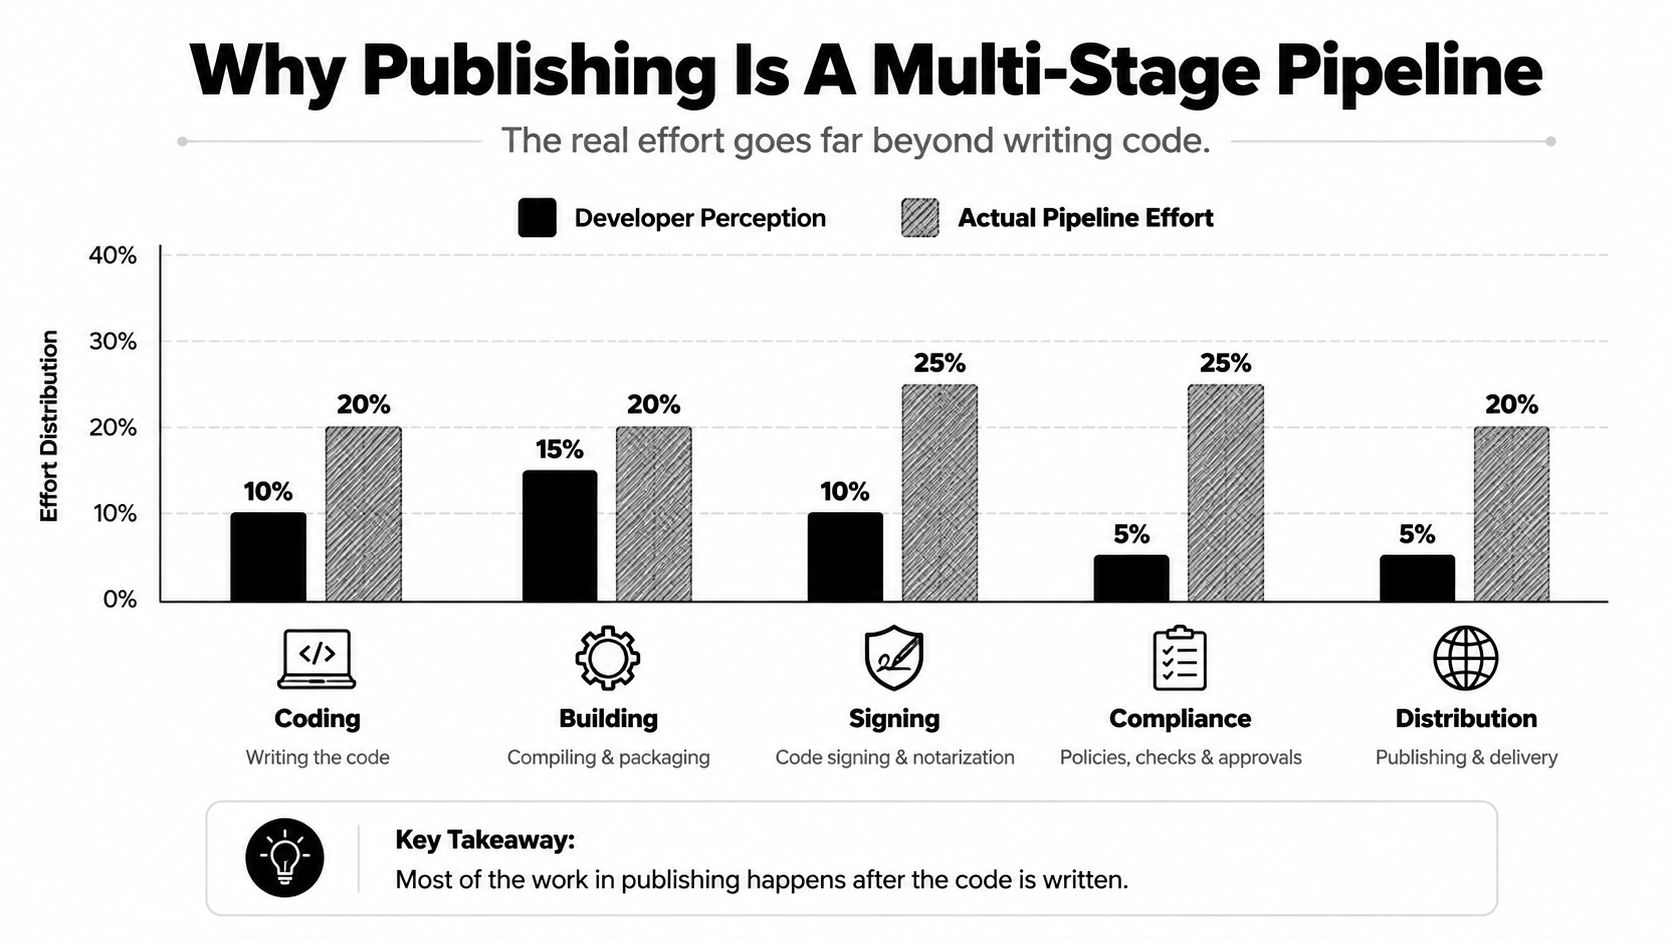
A React Native release looks simple from a distance, until the first store submission exposes how many moving parts sit behind it. The binary is only one artifact in a chain that also includes app icons, screenshots, release notes, signing material, privacy answers, reviewer access, and a store listing that has to match the behavior of the build you uploaded. Miss any one of those pieces and the store reviewer has a clean reason to stop the launch.
The ecosystem has also changed how teams produce release artifacts. The 2024 State of React Native survey build-and-publish section tracks tools like EAS Build and EAS Submit next to manual Xcode and Android Studio workflows, which shows how much release work has moved into cloud-based pipelines. React Native's own publishing guide still describes the classic iOS route, open Xcode, archive, upload to App Store Connect, then hit Submit For Review. React Native publishing guide, State of React Native build and publish section show the split clearly, modern teams often automate the build, but the store-side steps haven't gotten any looser.
<a id="the-release-is-a-pipeline-not-a-button"></a>
The release is a pipeline, not a button
A clean publish flow usually starts long before the upload. You need a release build first, then you need to prove it's signed correctly, then you need to make sure the store backend has everything required to review and approve it. On iOS, Apple's guide is explicit about the path, archive in Xcode, distribute through App Store Connect, choose the uploaded build, and submit it for review. On Android, the common path is a signed AAB upload in Play Console with the store listing and policy fields already filled in.
Practical rule: if you can't explain which artifact the store is reviewing, you're not ready to submit yet.
Cloud build systems matter because they separate the release artifact from a developer laptop, which is where a lot of hidden state lives. I've seen teams waste hours because their local machine had an old signing setup, stale bundle cache, or a debug-flavored config that never should've reached release. With a production build pipeline, the right question isn't “did the app compile,” it's “did it compile with the exact release settings the store will inspect.”
<a id="internal-testing-catches-the-wrong-kind-of-confidence"></a>
Internal testing catches the wrong kind of confidence
Internal distribution builds are useful because they force you to look at the same artifact users will eventually install. That matters more than a simulator run or a Metro hot reload session, because those paths don't prove the release bundle behaves correctly under store signing and release optimizations. If your app crashes only in a release build, that's not a store problem, it's a release readiness problem.
Teams also need to stop treating submission as an end-of-day admin task. Store friction tends to show up late, after the app looks “done.” A developer can ship code all week and still lose the weekend on screenshots, reviewer credentials, or a missing privacy URL. The publishing pipeline punishes shortcuts because every stage depends on the previous one being boring and correct.
<a id="signing-your-app-without-losing-a-weekend-to-keychain"></a>
Signing Your App Without Losing a Weekend to Keychain
Signing is where a lot of otherwise competent teams burn time. iOS asks you to manage distribution certificates, provisioning profiles, entitlements, and sometimes push notification keys or App Store Connect API credentials. Android asks for an upload keystore, key alias, and a secure way to keep those files from disappearing when one person leaves the team. Lose the wrong credential on either side and the release process gets ugly fast.
<a id="keep-the-production-identity-out-of-someones-laptop"></a>
Keep the production identity out of someone's laptop
The sane approach is to treat signing material like production access, not like a local dev convenience. EAS Credentials helps here by moving most of the sensitive setup into a managed workflow, which is a lot less fragile than hand-carrying certificates across laptops and CI runners. Manual signing still works in Xcode and Android Studio, but it's brittle when you have multiple engineers, build servers, and release branches.
The main failure mode is not complexity, it's drift. Someone regenerates a certificate, someone else updates a provisioning profile, a CI job still references the old identity, and suddenly the release build no longer matches the app ID or entitlements you expected. That's why backups matter. Keep the .p12 and .jks files somewhere controlled, ideally in a shared password manager with clearly named ownership and recovery steps.
<a id="verify-the-artifact-before-you-upload-it"></a>
Verify the artifact before you upload it
A signed build should be checked like a release candidate, not trusted because the CLI finished without errors. The bundle identifier should match the store record. The signing identity should match the environment you intended. Entitlements should reflect what the app uses, especially if push, sign-in, or background permissions are involved.
For a practical local check, inspect the released .ipa or .aab before anyone touches App Store Connect or Google Play Console. Make sure the artifact is really the production build and not an internal or preview variant with different package settings. If you're using EAS, the build profile should line up with the store target, because a clean build with the wrong profile is still the wrong release.
Don't “fix” signing by rebuilding randomly until it passes. Find the credential mismatch once, document it, and lock it down.
Video overview for the signing flow:
<iframe width="100%" style="aspect-ratio: 16 / 9;" src="https://www.youtube.com/embed/SPWt7mCz_uY" frameborder="0" allow="autoplay; encrypted-media" allowfullscreen></iframe>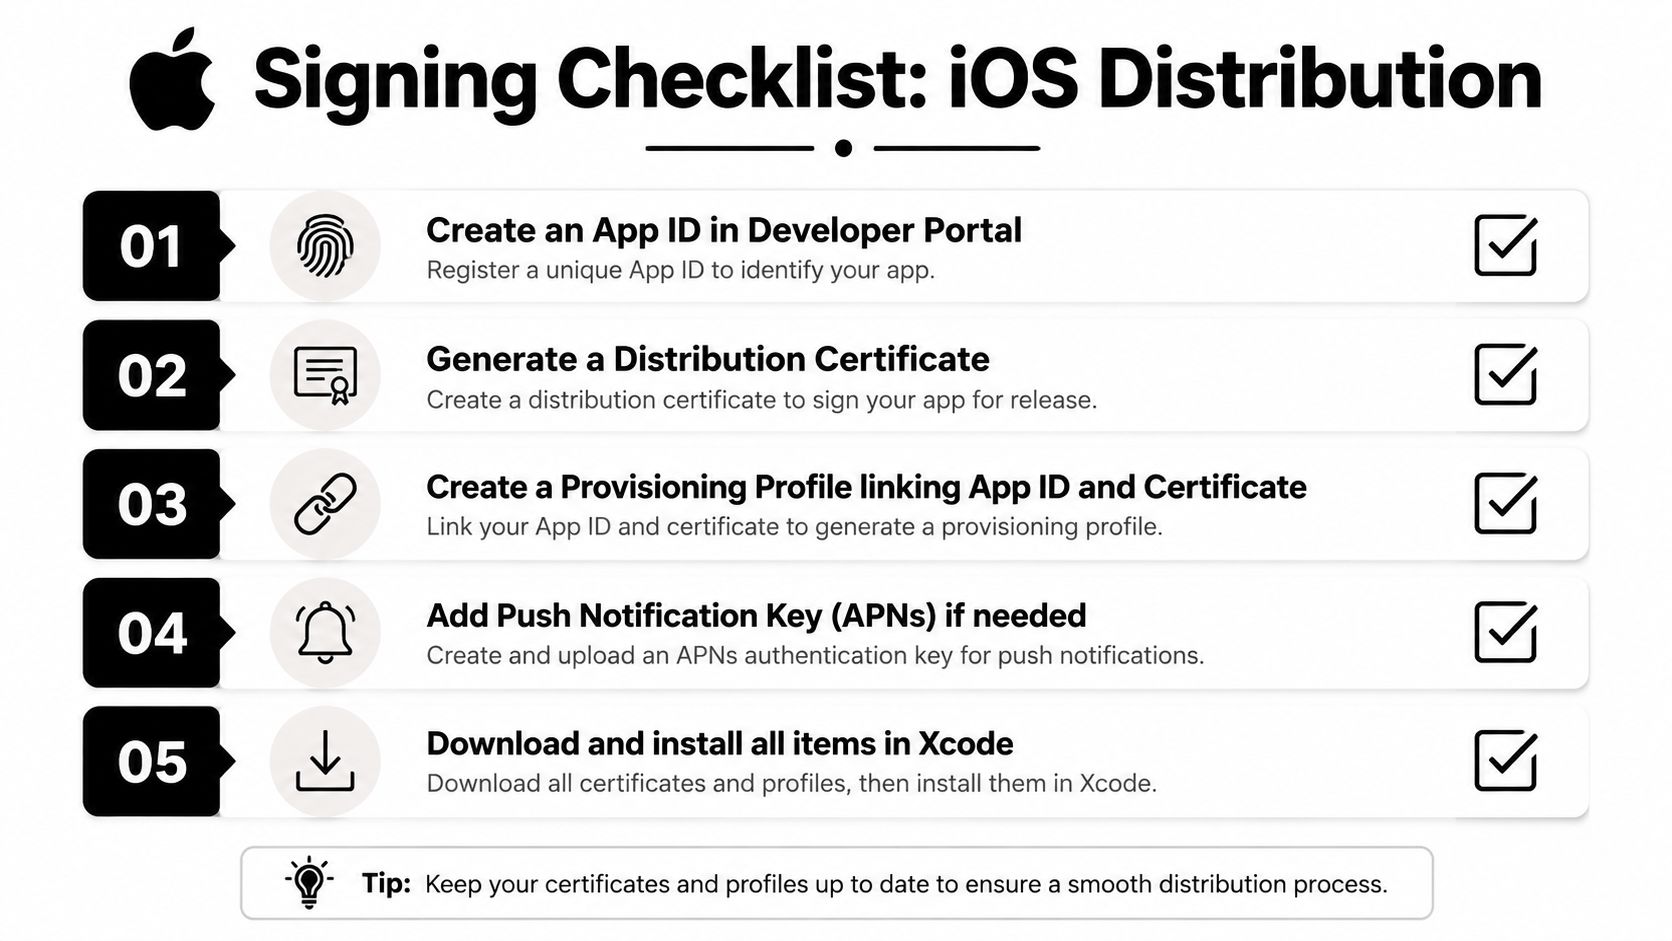
<a id="setting-up-app-store-connect-and-google-play-console-the-right-way"></a>
Setting Up App Store Connect and Google Play Console the Right Way
Most submission pain comes from bad store setup, not bad code. A clean App Store Connect record and a properly configured Google Play Console listing remove a lot of avoidable rejection risk before a reviewer ever opens the app. If the metadata is thin, inconsistent, or missing the obvious fields, reviewers notice immediately.
<a id="app-store-connect-needs-more-than-a-title"></a>
App Store Connect needs more than a title
Apple's publishing flow still expects a proper store record with the details that describe the app, what it does, and how reviewers can access it. That usually means the app description, keywords, support URL, marketing URL, screenshots for the required device sizes, release notes, and reviewer login credentials if the app sits behind authentication. If you're shipping a React Native app with sign-in, don't make the reviewer guess how to get in.
The keyword field deserves more care than many teams give it. It's not where you cram every phrase, it's where you front-load the words that describe the app's purpose. The first impression matters just as much in review as it does in search, because the store team is deciding whether the listing, binary, and reviewer notes all agree.
<a id="google-play-console-is-more-structured-and-less-forgiving"></a>
Google Play Console is more structured, and less forgiving
Google Play asks for a different set of assets and fields, and they need to be aligned before review. The usual submission package includes a short description, full description, phone and tablet screenshots, a 1024×500 feature graphic, a 512×512 app icon, a content rating, and a privacy-policy URL. Those fields aren't decorative. They're part of the approval path.
The practical mistake I see most often is stale imagery. If the screenshots still show placeholder content, demo data, or an unfinished login screen, the store reviewer treats that as the product. The same goes for missing reviewer notes. If an app needs a test account or a non-obvious flow to reach the main experience, spell it out clearly in the submission.
A small but important point, store assets should describe the shipped product, not the prototype. That includes naming, icons, and screenshots. If the store listing suggests one thing and the app binary behaves like another, rejection is the predictable outcome.
<a id="compliance-privacy-and-the-data-safety-questionnaire"></a>
Compliance, Privacy, and the Data Safety Questionnaire
A technically solid build can still bounce if the compliance layer is sloppy. Privacy policy, data declarations, permission usage, and store labeling all have to line up with the app's actual behavior. If they don't, the reviewer doesn't need to diagnose intent, they can just reject what's in front of them.
<a id="the-privacy-policy-has-to-be-real-public-and-specific"></a>
The privacy policy has to be real, public, and specific
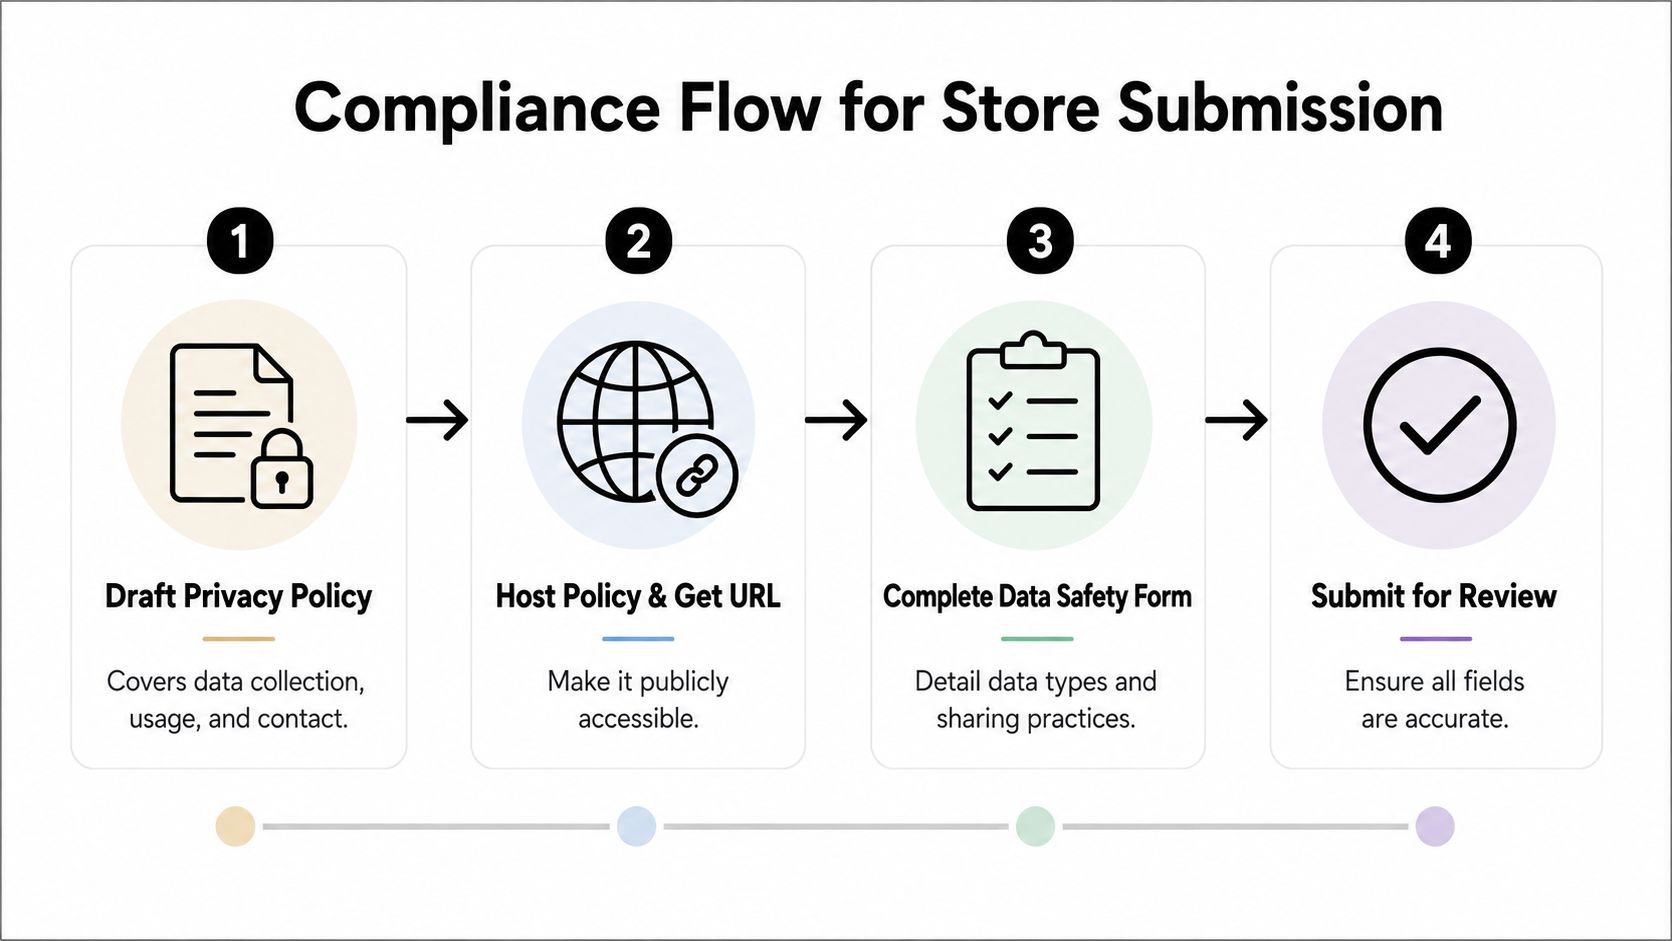
Both stores expect a privacy policy URL, and that policy has to say what data is collected, why it's collected, which third-party SDKs are involved, and how users can contact the team. A vague placeholder page won't hold up. Host it on a public page you control, keep the language plain, and make sure it matches the app's real data flows.
That matters even for apps that don't feel “data heavy.” If you use analytics, crash reporting, ads, authentication, or push notifications, the policy should describe that. The store reviewer isn't looking for marketing language, they're checking whether your declarations make sense.
<a id="the-data-questionnaire-and-privacy-labels-need-to-match-the-code"></a>
The data questionnaire and privacy labels need to match the code
Google Play's Data Safety form and Apple's App Privacy labels are only useful if they reflect the actual app. If you declare one thing and ship another, the mismatch can lead to review failure or later enforcement. The same applies to permission prompts. Don't request background location, contacts, SMS, or tracking access unless the product needs them.
If the app uses third-party SDKs, check what those SDKs do before you fill out the forms. A crash reporter or ad network can change what you need to declare. On Apple's side, the privacy manifest requirements for third-party SDKs mean you can't just bolt on a library and assume the paperwork won't notice.
<a id="the-compliance-details-that-trip-teams-up"></a>
The compliance details that trip teams up
- Reviewer access: If the app has sign-in, make sure the reviewer gets credentials that work.
- Permission strings: If iOS asks for camera, location, or photos access, the app should explain why in plain language.
- Content rating: Rate the app based on its actual behavior, not the intended audience.
- Store notes: If a feature is hidden behind a specific flow, tell the reviewer how to reach it.
A clean compliance package doesn't make the app better. It keeps the reviewer from having to guess, and guessing is where rejection starts.
<a id="common-rejection-reasons-and-exactly-how-to-fix-them"></a>
Common Rejection Reasons and Exactly How to Fix Them
Most rejection emails are frustrating because they're specific enough to be actionable, but only if you know how to read them against a React Native codebase. The same few patterns repeat: release-only crashes, inaccessible demo flows, privacy mismatches, and assets that don't match the actual product. The fix is usually not a rewrite, it's a disciplined pass over the release candidate.
<a id="read-the-rejection-against-the-app-not-against-the-message"></a>
Read the rejection against the app, not against the message
Apple's Guideline 2.1 usually means the reviewer hit a crash, a blocked flow, or a broken release build. In React Native, that often comes from a release-only bug, a missing permission string, or a native module that behaves differently once the app is signed and optimized. Guideline 2.3 usually points to placeholder screenshots, dead demo accounts, or a reviewer path that doesn't work outside the development team.
A 4.0 rejection often lands when the app feels like a thin clone, or when the content looks restricted, low-value, or misrepresented. 5.1.1 is the privacy bucket, and it shows up when the app's behavior doesn't match the data disclosures or permissions the team filed. On Google Play, target API level issues, Data Safety mismatches, and generic policy notices often trace back to the same root cause, declared capabilities don't match what the code and permissions do.
<a id="the-fastest-fix-is-usually-a-targeted-resubmission"></a>
The fastest fix is usually a targeted resubmission
When I've seen a 2.1 rejection in a React Native app, the shortest path is usually to reproduce it in a release-like environment, often with TestFlight or a production-style internal build, then narrow down the one native permission, initialization order, or release-only branch that broke. Don't reply with “works on my machine.” Reply with the exact fix, the build you used to validate it, and how the reviewer can re-test.
| Rejection | Likely RN Cause | Fix |
|---|---|---|
| 2.1 | Release-only crash, missing permission string, native module mismatch | Reproduce in a production-style build, patch the crash path, resubmit with notes |
| 2.3 | Demo login broken, placeholder screenshots, hidden flow not explained | Provide working reviewer credentials, update screenshots, add clear access notes |
| 4.0 | App looks like a clone or ships restricted content without enough distinction | Clarify original functionality, remove misleading assets, explain the use case |
| 5.1.1 | Privacy label or Data Safety form doesn't match tracking or collection behavior | Correct the disclosure, align permissions, update policy and resubmit |
A reviewer reply should be short, factual, and helpful. State what changed, where it was fixed, and how to verify it. The goal is to remove ambiguity, not to debate policy language.
<a id="release-strategies-phased-rollouts-and-the-new-closed-test-rule"></a>
Release Strategies, Phased Rollouts, and the New Closed-Test Rule
Submitting a build is not the same thing as launching responsibly. A controlled rollout gives you a chance to catch crash spikes, auth failures, or store-side surprises before the whole audience sees them. That's especially important for React Native apps, where the release path can still expose native differences even when the JavaScript bundle looks stable.
<a id="start-with-the-smallest-release-that-gives-you-signal"></a>
Start with the smallest release that gives you signal
Apple's phased release lets you move in steps from 1% to 2%, 5%, 10%, 20%, 50%, and finally 100%. Google Play's staged rollout works differently, but the principle is the same, release to a limited group first, then expand once the signal looks good. The same idea applies to internal and closed tracks before production.
For newer Google Play Console accounts, the onboarding friction is real. The current closed-test requirement includes a 14-day test period and 12 opted-in testers, and that has caught a lot of teams that assumed they could go straight to production. Rapid Native's publishing walkthrough is a good reminder that newer accounts still face store-side trust gates, even when the build pipeline itself is automated.
<a id="treat-the-first-day-like-a-live-incident-window"></a>
Treat the first day like a live incident window
If a rollout is going to break, it often breaks early. That's why the first hours matter more than the percentage itself. Watch crash reports, sign-in completion, payment behavior if relevant, and any path that touches permissions or external services. If the build looks stable, increase slowly. If it doesn't, stop the rollout before you turn a small problem into a broad one.
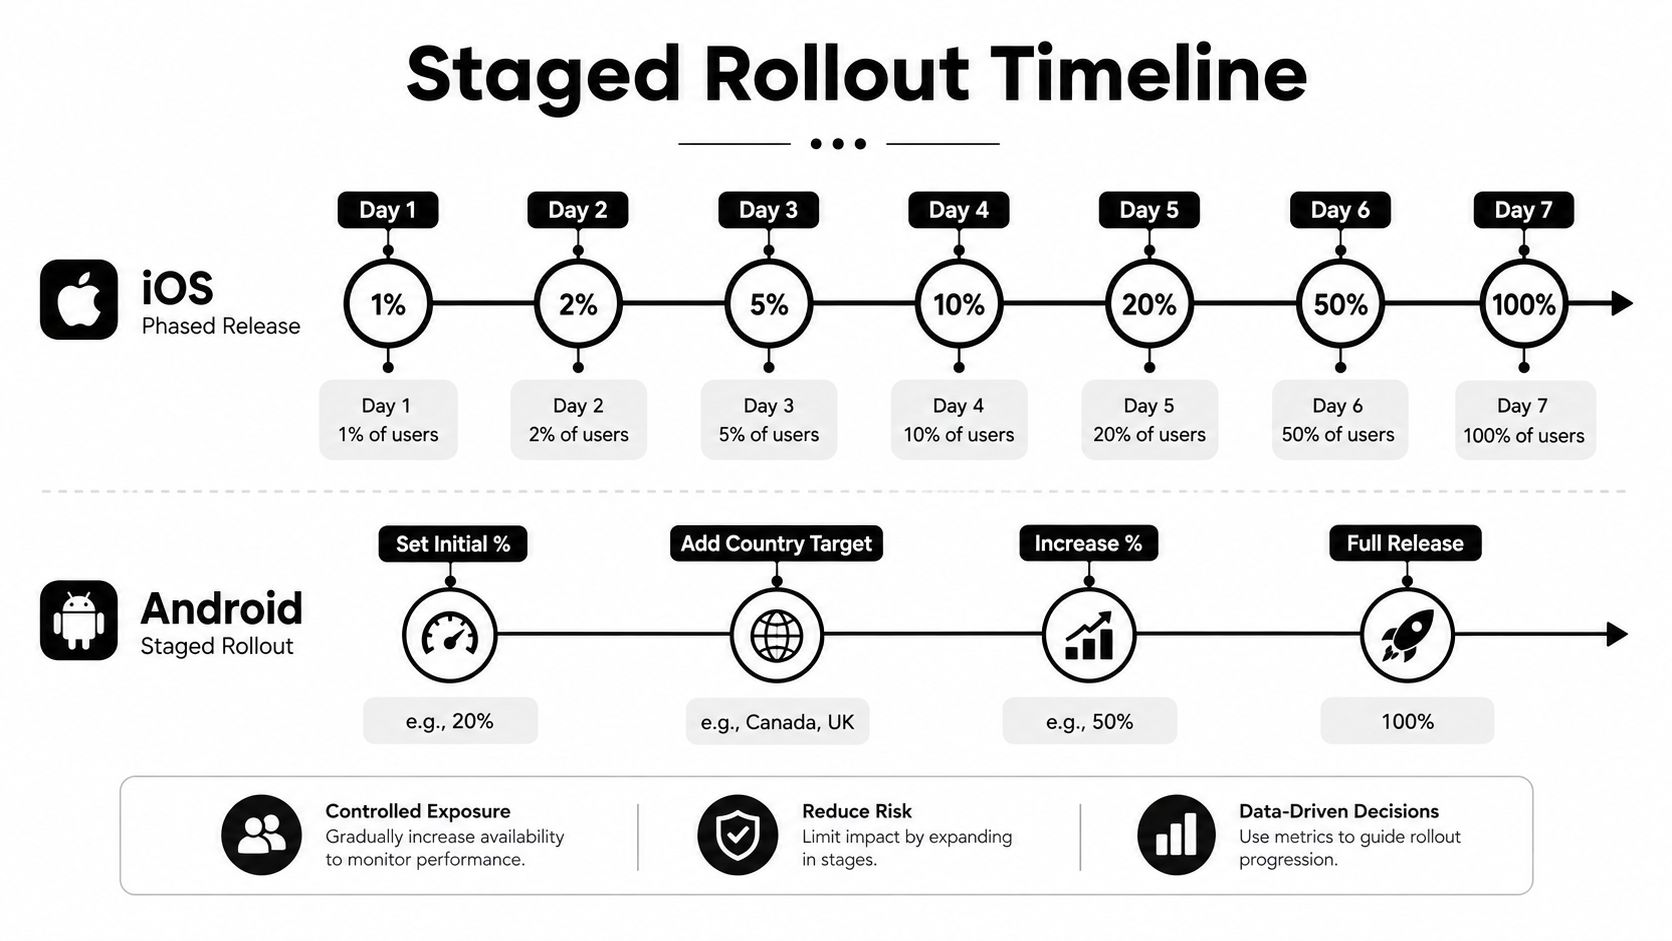
An internal or closed test is also where EAS Submit earns its keep. It lets you map the release channel to the right track without turning every handoff into a manual upload session. That doesn't remove the store gates, but it does remove a lot of the operational noise around them.
<a id="realistic-timelines-and-when-a-launch-service-actually-pays-off"></a>
Realistic Timelines and When a Launch Service Actually Pays Off
A React Native launch usually takes longer than the code review suggests, because the time goes into everything around the binary. Asset production, store copy, signing setup, compliance forms, and reviewer back-and-forth eat the calendar. The build itself is rarely the slowest part.
<a id="the-schedule-is-mostly-waiting-and-preparation"></a>
The schedule is mostly waiting and preparation
A realistic launch sequence often looks like this, a few days to finalize assets and copy, a short window to get builds and signing correct, another block of time for listings and compliance, then review time for each submission. Store review itself can take days, and resubmissions add more delay because every change has to cycle back through the queue.
That's why the in-house versus service decision should be made against your deadline, not your engineering pride. If you have room to learn the whole process, self-publishing is fine. If a product launch, revenue milestone, or marketing window depends on the app going live on time, the release process becomes a delivery problem, not a learning exercise.
<a id="when-outside-help-starts-to-make-sense"></a>
When outside help starts to make sense
A launch service such as LetsDeployIt is one option when the team wants the store work handled as an operational package, not as a side project. In practical terms, that means listing copy, screenshots, signing setup, privacy hosting, reviewer notes, the Play Console closed test, and resubmission handling are managed together instead of spread across different teammates.
That kind of support is most useful when the team already has the app built and doesn't want to spend weeks untangling store-specific tasks. It's not a substitute for product quality, but it can remove a lot of the friction that slows first-time launches.
<a id="a-simple-rule-for-deciding"></a>
A simple rule for deciding
- Self-publish when the app is low urgency and the team wants to learn the stores firsthand.
- Use a launch partner when the deadline is fixed, the team is small, or the store workflow is already blocking release.
- Stage every launch unless you have strong evidence the app is stable and the reviewer path is trivial.
A good release process doesn't end with upload. It ends when the app is live, the rollout is controlled, the reviewer can verify the claims in the listing, and the team can explain every field in the submission without checking three different docs.
If you want the store work handled as a single release operation instead of a dozen separate tasks, visit LetsDeployIt. The team prepares React Native and Expo launches for App Store and Google Play submission, including signing, store assets, compliance, and closed-test management, so your release doesn't stall at the same places most first launches do.