React Native Deploy iOS: A Complete Guide for 2026
Master react native deploy ios in 2026 with our step-by-step guide covering code signing, TestFlight, and App Store approval for a smooth release.

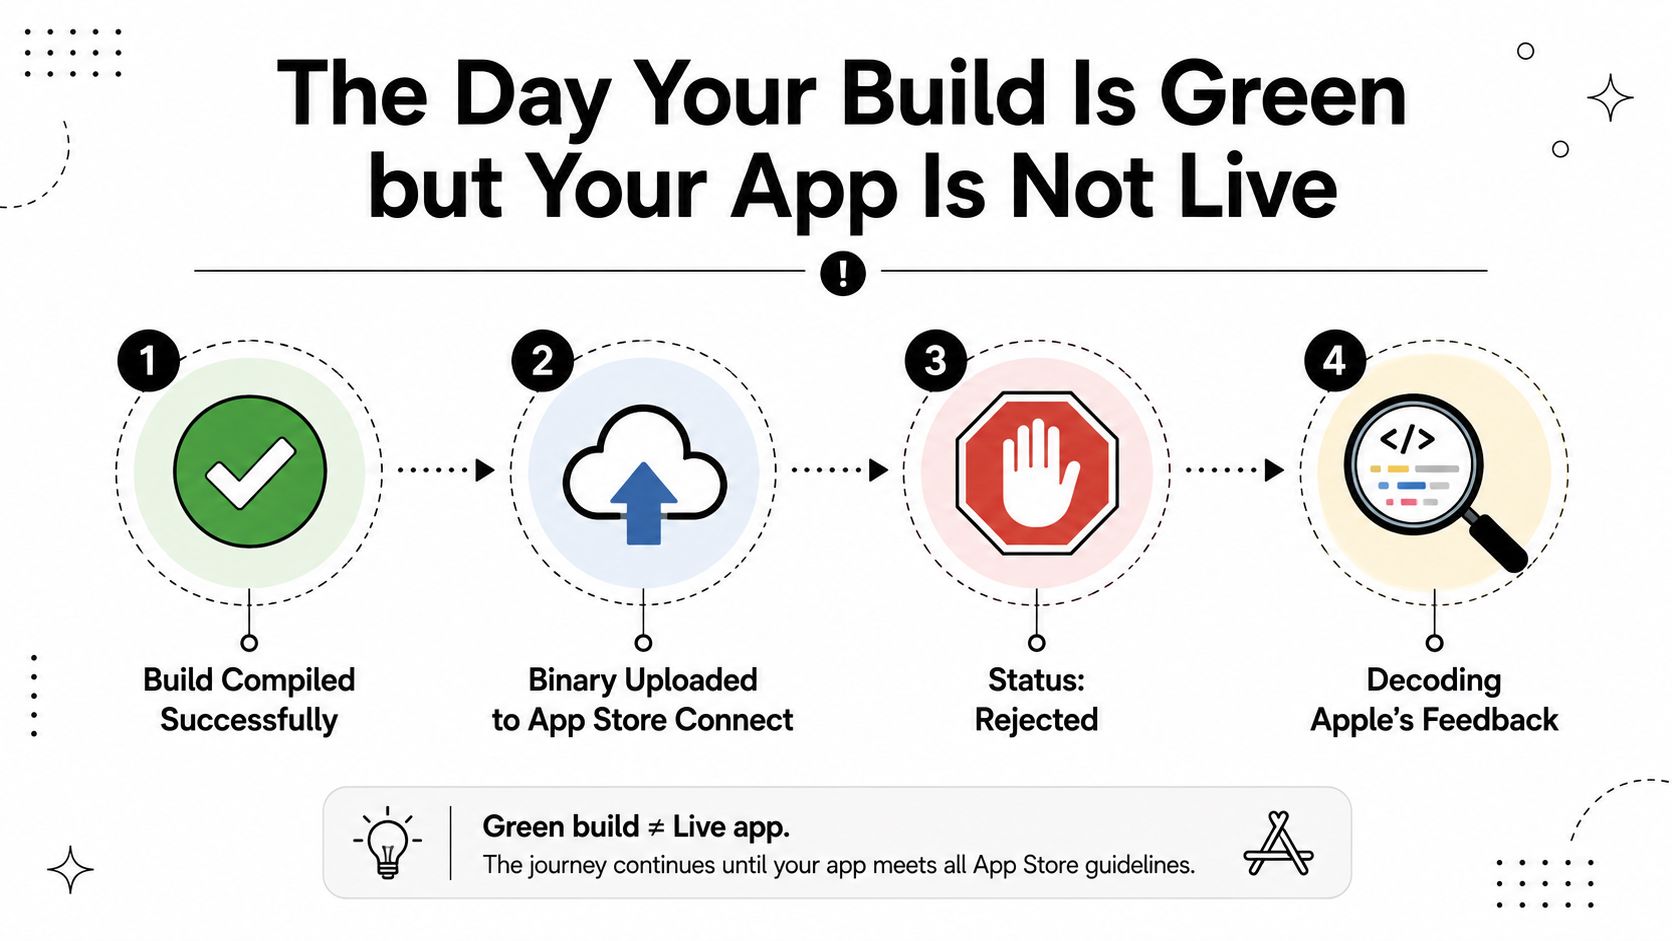
You've just watched a React Native release build finish without errors. The IPA uploaded to App Store Connect, processing completed, and the team started planning the launch announcement. Then the status changed to Rejected, leaving everyone to decode Apple's message while trying to determine whether the problem is in JavaScript, native configuration, metadata, or policy compliance.
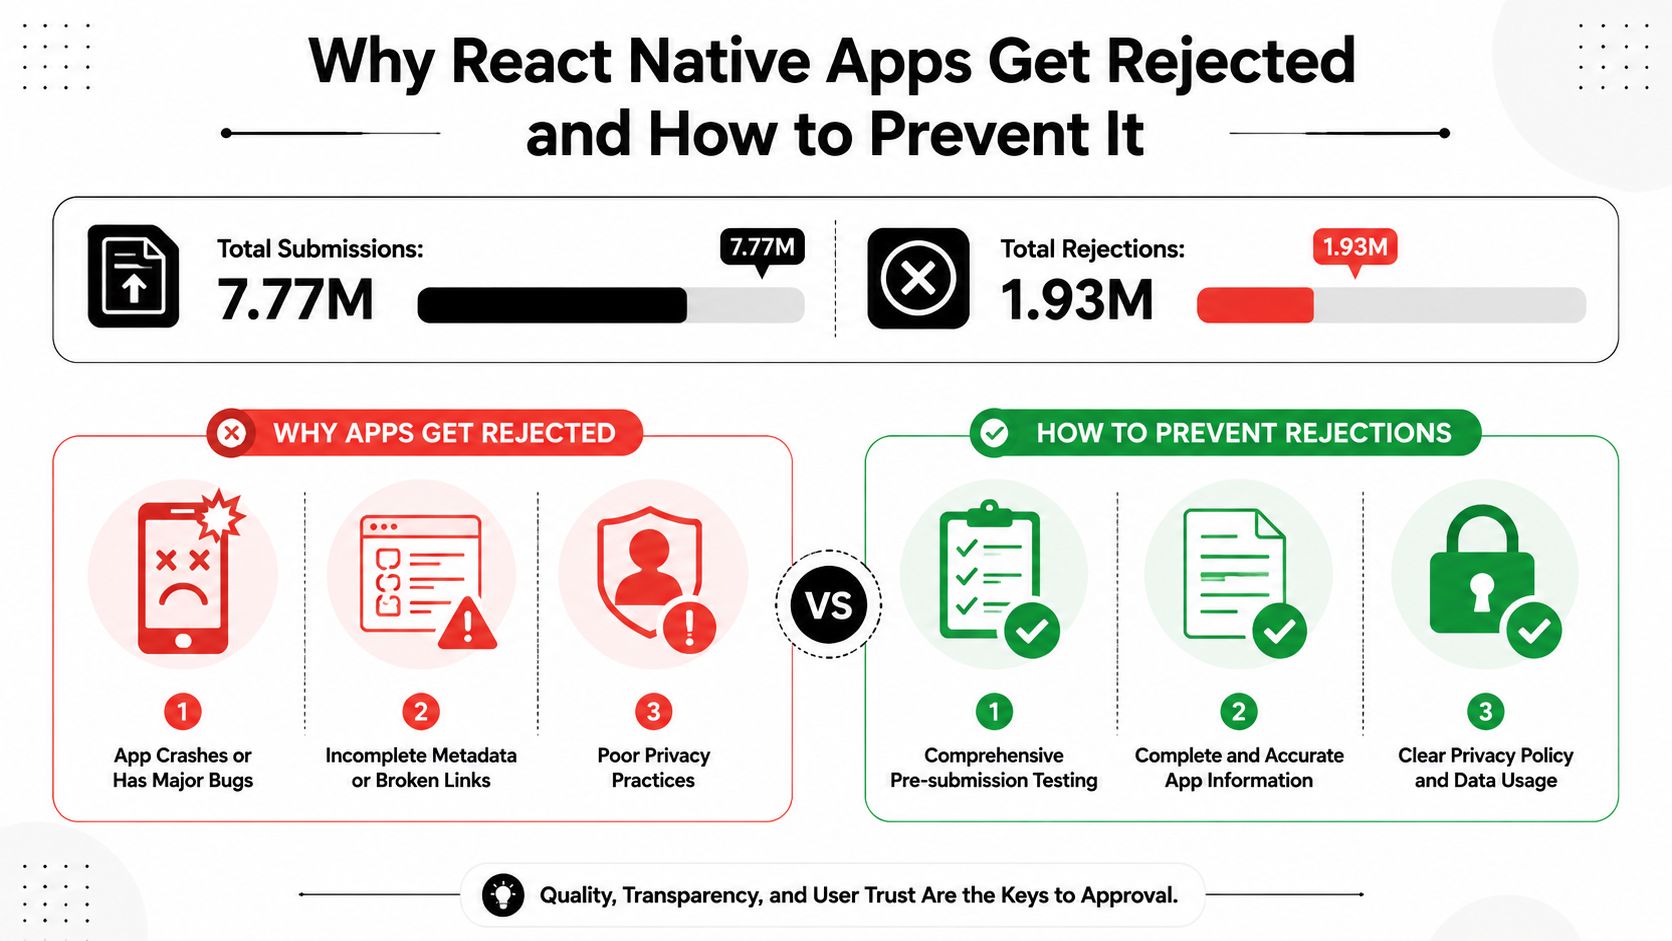
That scenario is common because react native deploy ios work isn't only a compilation task. TestFlight distribution is comparatively straightforward. App Review is a separate operational discipline, where privacy declarations, reviewer access, device behavior, signing, metadata, and release-only bugs all matter. Apple's 2024 App Store Transparency Report records 7,770,000 app submissions reviewed and 1,931,400 rejected, an implied overall rejection rate of about 24.9%.
This guide treats deployment as a launch project. The build is one deliverable. Approval is the outcome.
Table of Contents
- The Day Your Build Is Green but Your App Is Not Live
- Choosing Your Build Path Between Xcode and EAS Build
- Certificates, Profiles, and Signing Without the Pain
- Building, Archiving, and Uploading the React Native IPA
- App Store Connect Metadata, Screenshots, and TestFlight
- Why React Native Apps Get Rejected and How to Prevent It
- Your 10-Day React Native iOS Launch Plan
<a id="the-day-your-build-is-green-but-your-app-is-not-live"></a>
The Day Your Build Is Green but Your App Is Not Live
The most frustrating rejection usually arrives after the technical work appears complete. The repository is clean, Xcode reports a successful archive, and App Store Connect accepts the upload. Nothing looks broken until Apple's review status turns red. At that point, the team has to reproduce behavior on review devices, verify the privacy answers, inspect every URL, and work out whether a third-party SDK introduced a problem that never appeared in development.
React Native adds another layer to that investigation. A release binary contains native iOS code, CocoaPods dependencies, and a JavaScript bundle, so a simulator test in debug mode doesn't prove that the production artifact will launch correctly. A missing release bundle, an incorrect export setting, or a release-only native crash can survive local development and appear only after submission. The official React Native App Store publishing guidance reflects this native release reality, including Xcode, CocoaPods, signing assets, and production bundling.
<a id="put-the-launch-prerequisites-on-paper"></a>
Put the launch prerequisites on paper
Before anyone presses Archive, create a deployment checklist that names the owner for every dependency. You'll need:
- Apple Developer access: A current Apple Developer Program membership, with the submitting person assigned an appropriate App Store Connect role such as Admin or App Manager.
- App Store Connect setup: A paid account connected to the organization's banking and tax information, plus an app record using the intended bundle identifier.
- Bundle identity: A unique bundle ID that matches the production target and won't collide with another app, extension, staging target, or old project.
- Signing assets: An active distribution certificate in the relevant keychain, or a managed signing setup that can create and retrieve the required credentials.
- Mac tooling: A Mac with a current Xcode installation, Node, Watchman, CocoaPods, and the project's expected React Native CLI or Expo tooling.
- Privacy material: A privacy policy hosted at a stable URL on a real domain, alongside accurate answers for the App Store Connect privacy questionnaire.
Don't leave the policy URL until the final hour. A page that redirects unexpectedly, requires authentication, returns an error, or describes a different product gives review an avoidable reason to pause or reject the submission.
<a id="treat-ios-as-a-review-risk-system"></a>
Treat iOS as a review-risk system
Apple's volume makes a casual release process expensive in engineering time. The transparency report identifies performance-related problems, including crashes, broken links, incomplete builds, and device compatibility failures, among the highest-volume rejection areas. For a React Native team, that means the release candidate needs testing on physical devices with production configuration, not only a successful simulator launch.
Recent React Native deployment checklists also call attention to privacy-policy failures, screenshot dimensions, app icon transparency, incomplete metadata, and version-number mistakes. The React Native App Store submission checklist discusses these pre-review blockers and highlights how easily a submission can fail outside the archive itself.
Practical rule: Don't call the app “ready” when the IPA exists. Call it ready when the binary, metadata, privacy declarations, reviewer notes, and physical-device checks agree.
The framework's adoption makes this discipline relevant beyond a small group of specialists. React Native was publicly introduced in January 2015, open-sourced in March 2015, and initially focused on iOS before Android support followed in September 2015, as documented in the React Native history overview. A 2024 Statista analysis reported React Native in 13% of Apple App Store apps, which places the framework among the widely used SDKs in iOS distribution by the mid-2020s, as shown in Statista's Apple App Store SDK analysis.
<a id="choosing-your-build-path-between-xcode-and-eas-build"></a>
Choosing Your Build Path Between Xcode and EAS Build
There are two practical ways to produce an iOS release. A bare React Native project can build locally through Xcode, CocoaPods, and the React Native CLI. An Expo project, or a compatible React Native project, can use EAS Build to create the binary in the cloud and EAS Submit to send it to App Store Connect.
The local route gives you direct control over Xcode settings, native modules, build logs, and the machine that creates the archive. It also makes your team responsible for the Mac, Ruby and CocoaPods environment, certificates, provisioning profiles, and reproducibility. EAS removes much of that machine maintenance and handles signing through its credential workflow, but it adds cloud-build dependency, usage cost, and a closer relationship with Expo's configuration model.
| Dimension | Xcode Local Build | EAS Build |
|---|---|---|
| First successful build | Fast when the Mac and project are already configured | Fast for compatible projects after configuration |
| Signing | Managed locally through Xcode or a credential system | Can be managed through EAS credentials |
| Native control | Full access to projects, schemes, pods, and build settings | Native configuration still matters, but the build runs remotely |
| CI/CD | Requires a hosted or self-managed Mac runner | Cloud workflow fits teams without dedicated Mac infrastructure |
| Failure diagnosis | Detailed local Xcode and CocoaPods inspection | Remote logs are useful, but local reproduction may still be needed |
| Best fit | Teams with deep native customization or existing Mac automation | Solo developers and teams seeking repeatable cloud builds |
<a id="the-decision-rule"></a>
The decision rule
Choose EAS Build unless a native dependency or custom Xcode setup breaks the managed workflow, or your organization already operates a self-hosted Mac build fleet. For a solo developer, EAS usually removes the most fragile setup work. For a team, it provides a shared path that doesn't depend on one engineer's keychain or workstation.
A bare project still makes sense when native control is the product requirement. If you're maintaining custom extensions, unusual entitlements, or a mature Mac-based CI pipeline, moving to EAS can create migration work without solving an actual bottleneck. The right choice is the one your team can reproduce when the original submitter is unavailable.
<a id="certificates-profiles-and-signing-without-the-pain"></a>
Certificates, Profiles, and Signing Without the Pain
Signing becomes easier once each credential has a single job. A distribution certificate identifies the developer account authorized to sign a production app. A provisioning profile connects that signing identity to a bundle identifier and the capabilities required by the app. The profile and certificate have to agree with the target being archived.
Xcode's automatic signing is the sensible default. Select the correct development team, confirm the bundle identifier, enable the capabilities the app uses, and allow Xcode to manage the profiles. Manual signing is appropriate when several teams share a project, an organization requires tightly controlled credentials, or CI needs a deliberately fixed profile. It isn't automatically more professional, and it often creates more opportunities for mismatch.
<a id="managed-credentials-versus-local-credentials"></a>
Managed credentials versus local credentials
With EAS, use the credential manager to create and store the signing material instead of passing .p12 files between developers. Keep access controlled, document the account ownership, and make sure the production bundle ID is the one being signed.
For a bare project, Xcode can generate or retrieve credentials through automatic signing. If your CI system needs a certificate and profile, export them from Keychain and configure the runner securely. Never commit signing files, passwords, or private API keys to the repository.
The React Native-specific traps tend to appear at the boundary between configuration systems:
- Bundle ID mismatch: The value in
app.json, Expo configuration, or environment settings differs from the Xcode target. - Missing entitlements: Push notifications, Sign in with Apple, associated domains, or another capability is enabled in code but absent from the target.
- Wrong target: An extension or secondary scheme is being archived instead of the production application.
- Absent JavaScript bundle: The Release configuration doesn't embed the Metro output into the application.
- Stale pods: Native dependencies in
Podfile.lockdon't reflect the JavaScript package set being built.
<a id="run-this-check-before-archive"></a>
Run this check before Archive
- Confirm the production bundle identifier in every configuration source.
- Open the target's Signing & Capabilities panel and verify the team and entitlements.
- Install pods from the repository's intended lockfile.
- Select the Release configuration and a physical-device destination.
- Verify that the JavaScript bundle is generated or that the release script will generate it.
- Test push, authentication, deep links, and other entitlement-dependent features on hardware.
Signing errors are configuration errors with a cryptographic symptom. Compare the target, profile, certificate, and entitlements before regenerating everything.
<a id="building-archiving-and-uploading-the-react-native-ipa"></a>
Building, Archiving, and Uploading the React Native IPA
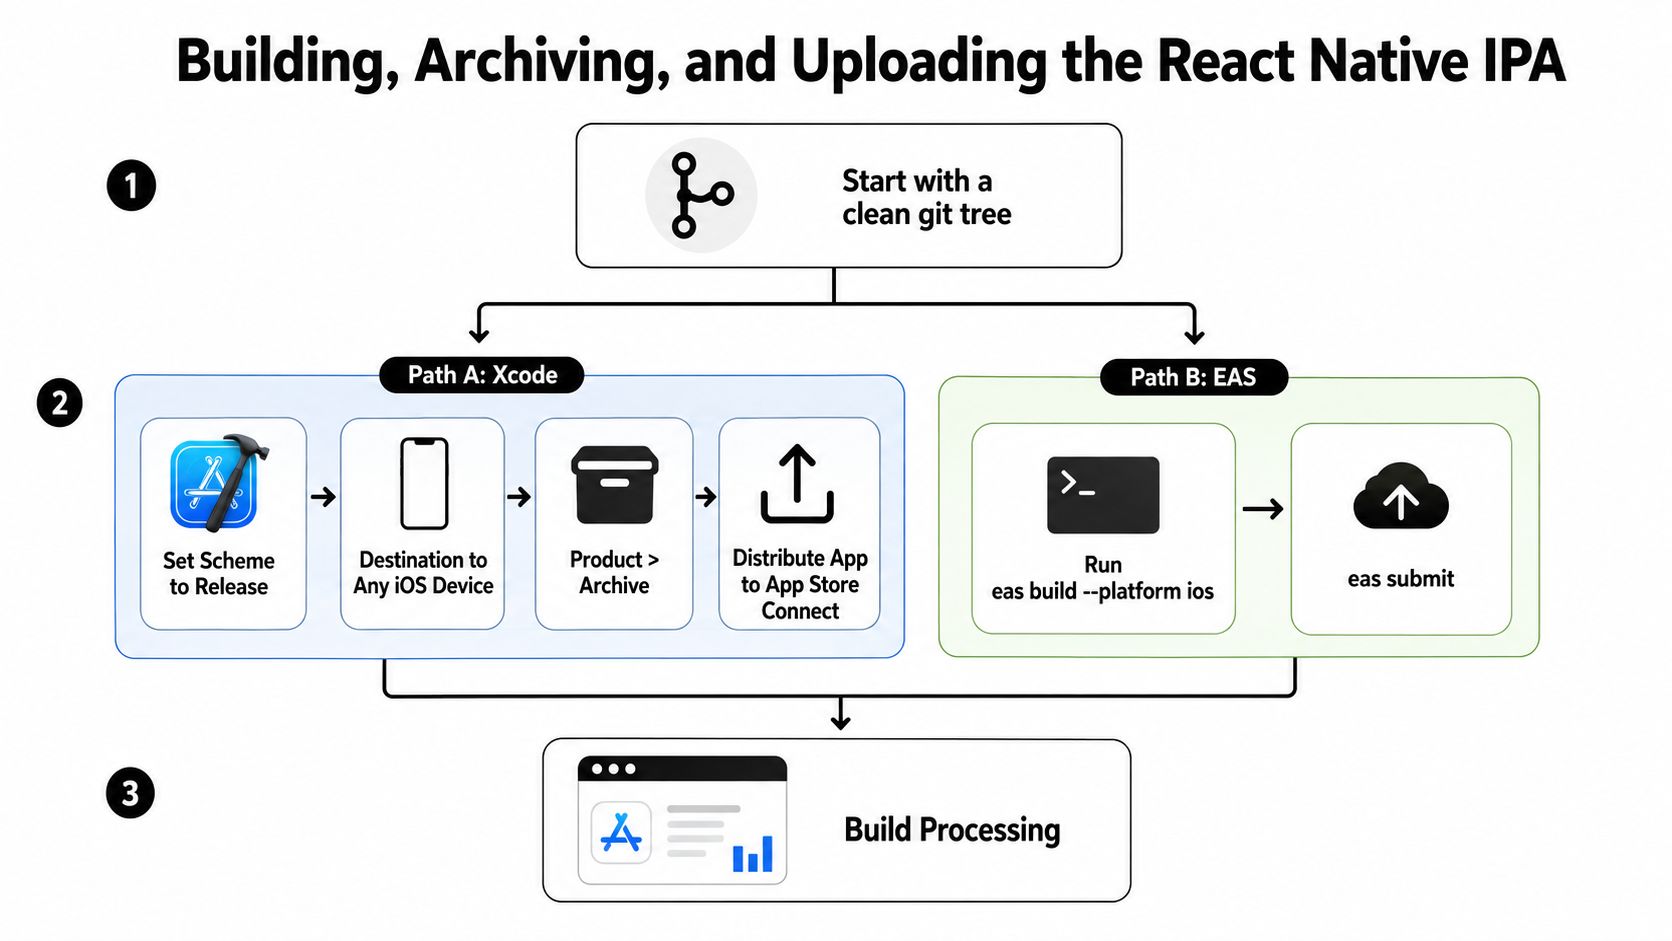
Start from a clean Git tree so you can identify whether a native or JavaScript change affected the release. Install JavaScript and CocoaPods dependencies, confirm the production version and build number, and then choose the build route.
For a local Xcode build, open the workspace rather than only the project when CocoaPods is involved. Select the production scheme, set the configuration to Release, choose Any iOS Device, and run Product > Archive. Xcode stores the archive in Organizer, where you can validate and distribute it to App Store Connect. Transporter is a useful alternative when the Organizer upload is unreliable on your network.
The important React Native detail is the JavaScript bundle. A production archive can compile native code successfully while still lacking the JavaScript required at launch. Use the project's supported release bundling script, or explicitly run the equivalent npx react-native bundle process before archiving when the native build configuration doesn't do it for you. A missing bundle can produce a white screen, a launch failure, or a release-only error.
<a id="eas-build-and-submit"></a>
EAS Build and Submit
For an Expo-based project, define a production profile in eas.json and keep the configuration committed. A minimal shape looks like this:
{
  "build": {
    "production": {
      "autoIncrement": true
    }
  }
}
Run the production build with:
eas build --platform ios --profile production
After EAS finishes and the artifact is available, submit it with:
eas submit --platform ios
The exact profile options depend on the project, but the operational sequence stays the same: resolve credentials, build a signed production artifact, wait for App Store Connect processing, then attach the processed build to the app version.
Whether the artifact comes from Xcode or EAS, inspect the result before submission. An .xcarchive is the archive generated by Xcode. An .ipa is the signed distributable application package. Build logs explain compilation and signing failures, but only a physical-device installation validates the behavior that matters to review.
<a id="app-store-connect-metadata-screenshots-and-testflight"></a>
App Store Connect Metadata, Screenshots, and TestFlight
A processed binary is only one part of the version record. In App Store Connect, create or select the app, confirm the bundle ID, choose the primary category, and complete the store listing. The description, promotional text, keywords, support URL, and marketing URL should describe the actual submitted experience, not a roadmap feature that reviewers can't access.
The privacy questionnaire deserves the same care as the code. Inventory the data collected by your own app and by included SDKs, then declare it accurately. Reviewers compare the questionnaire, permission prompts, privacy policy, and observed behavior. A mismatch creates questions even when the underlying feature is legitimate.
<a id="prepare-the-store-assets"></a>
Prepare the store assets
Screenshots need to represent real app screens and match the device classes requested in App Store Connect, including the 6.7-inch, 6.1-inch, and 5.5-inch categories where applicable. Marketing renders are useful, but they shouldn't obscure the interface or introduce transparent artwork that fails Apple's asset requirements. Check icons for unwanted alpha or transparency behavior before uploading them.
A preview video is worthwhile when motion explains the product faster than static screenshots. It isn't a substitute for clear screenshots, a working demo account, or reviewer notes. If the app requires login, provide functional credentials and explain any setup needed to reach the core experience.
<a id="use-testflight-as-a-release-gate"></a>
Use TestFlight as a release gate
Add internal testers as soon as the first processed build is available. Run the app on real devices and test the paths a reviewer will follow:
- First launch: Confirm the app opens without a network race, blank state, or unexpected permission loop.
- Authentication: Test new accounts, existing accounts, logout, password recovery, and any social login.
- Core flow: Complete the main action from start to finish with production services.
- Failure states: Disable connectivity, deny permissions, and use invalid input.
- Navigation: Open deep links, background the app, resume it, and rotate or relaunch where supported.
External TestFlight groups need beta review before distribution to external testers. Keep reviewer notes concise and operational. For teams that want this metadata layer handled alongside submission preparation, LetsDeployIt provides store copy, screenshots, privacy and Terms hosting, compliance checks, reviewer notes, and submission management for React Native and Expo launches.
<a id="why-react-native-apps-get-rejected-and-how-to-prevent-it"></a>
Why React Native Apps Get Rejected and How to Prevent It
Apple's 2024 review volume frames the problem clearly. As noted earlier in this guide, the App Store Transparency Report lists 7.77 million submissions reviewed and 1.93 million rejected. Performance issues, including crashes, broken links, incomplete builds, and device compatibility failures, formed the highest-volume rejection area. A successful upload proves only that App Store Connect accepted the package. It does not prove that the release is ready for review.
<a id="the-failure-usually-sits-outside-compilation"></a>
The failure usually sits outside compilation
A privacy URL that fails is easy to prevent. Open the exact App Store Connect URL in a clean browser session. Confirm that it loads without authentication and describes the submitted app. A 404 or inaccessible page leaves the reviewer without a usable privacy disclosure.
A release-only crash needs a physical-device pass. Run the production archive on real hardware with the same configuration used for submission. Check Hermes behavior, native-module initialization, notification permissions, camera and location access, and code paths hidden behind debug flags. A successful simulator launch does not cover these conditions.
Deep links need a first-launch test. A URL can work after initialization and still fail when a reviewer opens it before the app is ready. Test cold start, authenticated and unauthenticated states, and fallback behavior.
<a id="audit-policies-and-third-party-dependencies"></a>
Audit policies and third-party dependencies
Third-party SDKs require their own checklist. Inspect privacy manifests, permission strings, tracking behavior, and data declarations generated by analytics, advertising, authentication, and attribution packages. If the app uses tracking-related functionality, the App Tracking Transparency prompt and its explanation must match the actual behavior.
Sign in with Apple also needs testing when the app offers other social login options. Verify the capability, entitlement, account flow, and reviewer instructions together. A visible button that fails during account creation is both a functional defect and a review risk.
The 2025 State of React Native developer background survey records iOS as a core target for 1,380 respondents. That context explains why framework-specific release checks matter. Native dependencies, privacy manifests, ATT consent, Sign in with Apple, and review-device crashes can all affect an otherwise healthy JavaScript build.
A reviewer does not care that the debug build worked. They care whether the submitted binary behaves correctly, explains its permissions, and provides the access needed to evaluate it.
<a id="your-10-day-react-native-ios-launch-plan"></a>
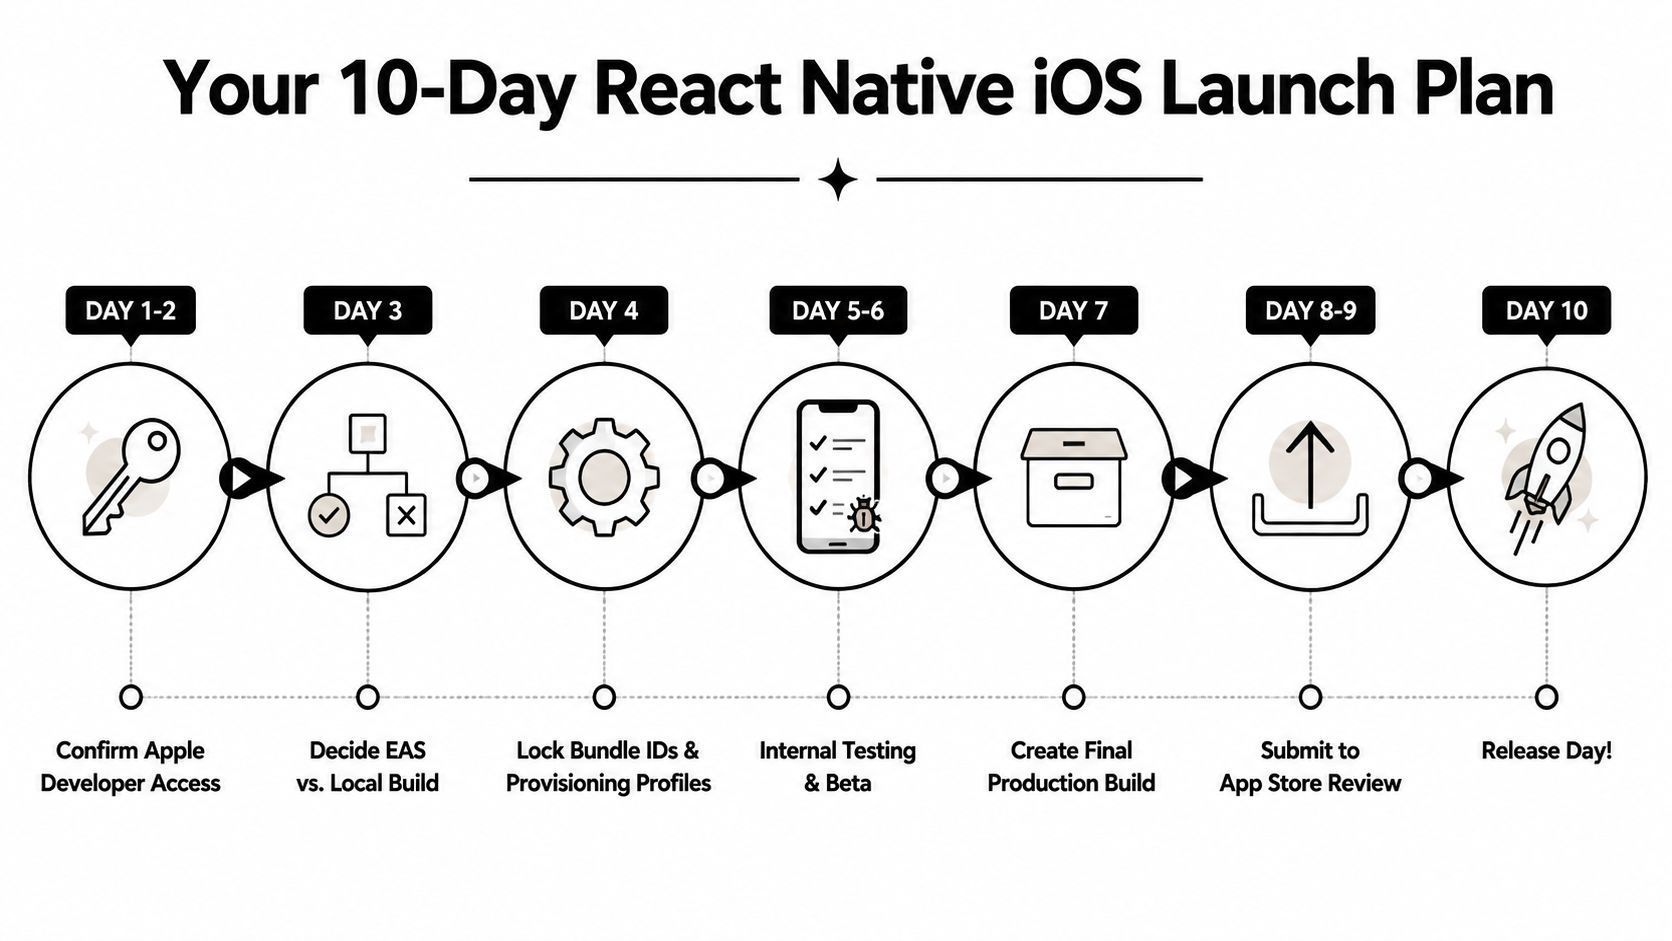
Your 10-Day React Native iOS Launch Plan
A launch plan works when it assigns a concrete output to each day rather than treating “submission” as one task. The schedule below assumes the application is functionally complete and focuses on deployment readiness.
Days 1 and 2, access and architecture. Confirm Apple Developer and App Store Connect roles, identify the production bundle ID, and choose between local Xcode builds and EAS. Verify that the person responsible for signing can access the required credentials without relying on another developer's machine.
Days 3 and 4, listing and compliance. Write the store description, promotional text, keywords, support information, and reviewer notes. Host the privacy policy, complete the privacy questionnaire, prepare screenshots for the required device classes, and inspect the app icon for unwanted transparency.
Day 5, release candidate. Produce a Release archive or EAS production build with the JavaScript bundle embedded. Upload through Xcode Organizer, Transporter, or EAS Submit, then wait for App Store Connect processing.
Days 6 and 7, device verification and review. Install the processed build through internal TestFlight. Exercise authentication, permissions, deep links, offline behavior, notifications, payments if applicable, and the main user journey on real devices. Fix crashes before submitting, not after Apple reports them.
Days 8 through 10, submission and monitoring. Submit the completed version, monitor the review status, respond promptly to App Store Connect messages, and keep the release notes and reviewer access available. Once approved, verify the live listing and download the production app as a new user.
This plan is achievable in-house, but it still requires someone to own credentials, metadata, screenshots, device testing, and reviewer communication every day. Teams that want to outsource that work can use LetsDeployIt for an end-to-end React Native or Expo launch, including signing, EAS Build and Submit, store assets, compliance checks, reviewer notes, and resubmissions, with pricing starting at $999 for one store or $1,799 for both, as described by the service.
If your React Native IPA is built but the App Store review risk is still unresolved, LetsDeployIt can prepare the metadata, screenshots, privacy materials, signing, submission, and reviewer responses as one managed launch. Send the team your repository or existing build path, and have a senior reviewer turn the deployment checklist into a submission plan.